Saving Zinnia Seeds

A seed head from a zinnia will produce hundreds of plants. (Photo by Charlotte Ekker Wiggins)

A seed head from a zinnia will produce hundreds of plants. (Photo by Charlotte Ekker Wiggins)

Saving Zinnia Seeds

I didn’t get my zinnias planted this year so I plan to make up for that next year. Zinnias, my all-time favorite annual flowers. Why?

They are very easy to grow.

Colorful.

Excellent for pollinators.

Wonderful as cut flowers.

And you can save their seeds for planting the following year.

I can’t remember the last time I bought zinnia seeds because friends have passed on theirs. These lovely colorful flowers have large seed heads, making it easy to dry them for planting over the next 2-3 years. I know, we all tend to think seeds last only a year. If stored in the correct dry conditions, most seeds will last for several years after collected and dried.

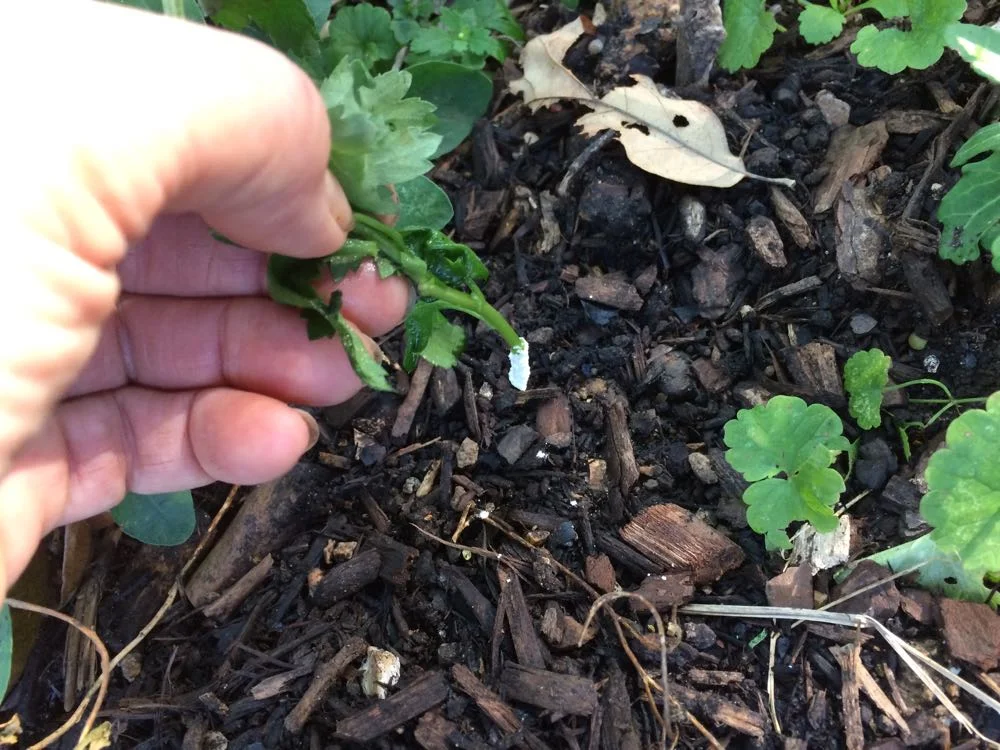
One question a friend asked was did she have to separate flower petals from the seeds. I say no as long as you get both nicely dry.

Dry the whole flower head; the flower petals will dry and mix in with seeds. (Photo by Charlotte Ekker Wiggins)

Dry the whole flower head; the flower petals will dry and mix in with seeds. (Photo by Charlotte Ekker Wiggins)

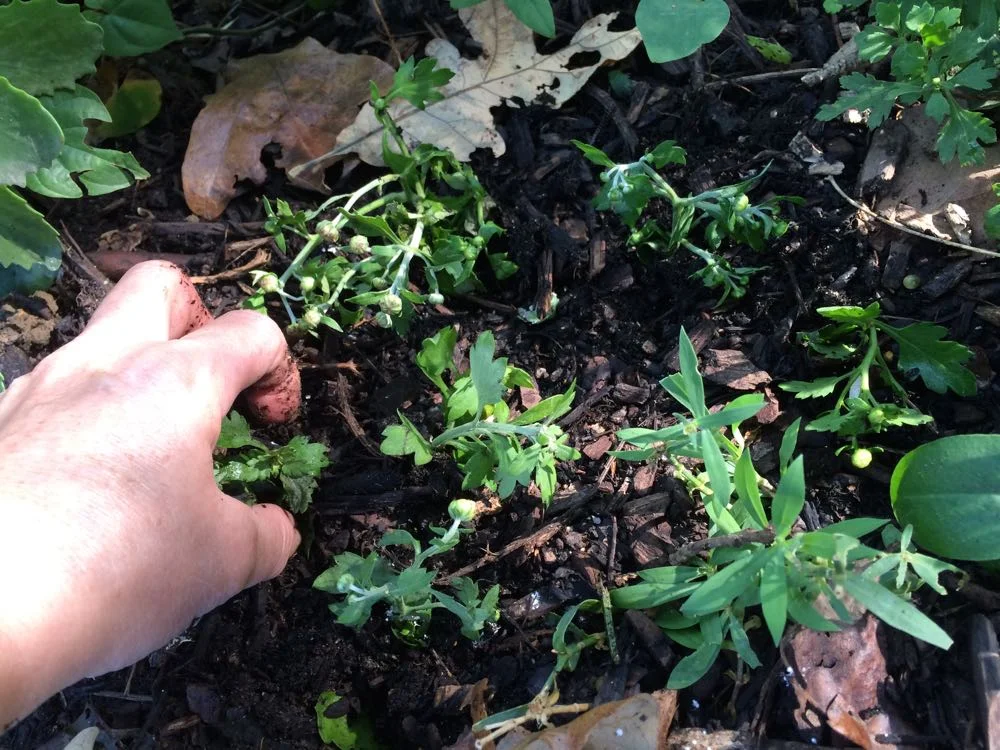
To dry the seeds, the key is to allow air to circulate through them so they can thoroughly dry.

This year, I am using a cardboard box that’s lined with brown paper. The brown paper helps to absorb and wick away any moisture. I toss the pile every time I walk by, ensuring that air gets through the pile.

I may even set up a second drying rack and distribute this stash of zinnias to ensure they are drying evenly.

A lined cardboard box I periodically toss is an excellent place to dry zinnias. (Photo by Charlotte Ekker Wiggins)

A lined cardboard box I periodically toss is an excellent place to dry zinnias. (Photo by Charlotte Ekker Wiggins)

And I already have the flower beds selected for planting these zinnia seeds next year.

This is a zinnia bouquet from last year, such a great combination of colors! (Photo by Charlotte Ekker Wiggins)

This is a zinnia bouquet from last year, such a great combination of colors! (Photo by Charlotte Ekker Wiggins)

You probably have seen zinnias growing in a variety of places, they are a garden favorite and usually covered in bees and butterflies. If I had my druthers on naming these flowers, I would have called them flutterbies.

I missed planting them this year because our midwest spring was too wet. Even if the same thing happens next year, these will be the first seeds that go out once the danger of frost is over, around Mother’s Day in May.

Looking forward to having zinnias back in my garden, and my house!

Charlotte

Monkey Around with Liriope

Monkey grass (liriope muscari) blooming all over my Missouri garden. (Photo by Charlotte Ekker Wiggins)

Monkey grass (liriope muscari) blooming all over my Missouri garden. (Photo by Charlotte Ekker Wiggins)

Monkey Around with Liriope

When one gardens on the side of a limestone hill, one needs to have allies. By allies I mean hardy plants that grow in almost any condition, tolerating drought, shade, too much sun, too much rain and getting trampled over. A lot. If they bloom, even better. Not possible?

Think again!

Monkey grass, also known as liriope muscari, has been my best buddy for years. The fact that people often toss out mounds of the stuff endears them to me even more. This ground cover, also called Lilyturf, may grow heady and fast in other soil but in my rocky hillside garden they are much better behaved.

I use monkey grass on my limestone hillside to mark paths. (Photo by Charlotte Ekker Wiggins)

I use monkey grass on my limestone hillside to mark paths. (Photo by Charlotte Ekker Wiggins)

So in this photo, the liriope are the mounds of green leaves bordering the path. Monkey grass is also referred to as border grass and for good reason. The little mounds of 10-12 inch green leaves make a great hearty border that can easily put up with getting stepped on. This is where I started using monkey grass.

As the little plants multiplied, I used them to line my uneven flower beds. This way when the tree trunks I use to mark the borders decompose, the monkey grass will still mark flower bed edges.

One of my new flower beds with old railroad ties as borders. As they decompose, monkey grass will line the flower bed. (Photo by Charlotte Ekker Wiggins)

One of my new flower beds with old railroad ties as borders. As they decompose, monkey grass will line the flower bed. (Photo by Charlotte Ekker Wiggins)

Monkey Grass reminds of something Jim Henson would have created for the Muppet Show. The green tuffs look like crazy hair and the last thing you expect to see in hot August are spikes of lavender flowers.

I have these hardy plants growing in both sun and shade. Here they are lining a narrow shady border at the side of my garage.

Liriope lines this shallow border where columbine and impatiens grow behind it. (Photo by Charlotte Ekker Wiggins)

Liriope lines this shallow border where columbine and impatiens grow behind it. (Photo by Charlotte Ekker Wiggins)

Now a word on hardiness. Once I get these in the ground, I have to make rounds every day because deer like to nibble on them.

This little collection of Monkey Grass was getting ripped out of the ground for weeks until I smothered them with wood chips to help them settle in.

This spot was too narrow to plant much but monkey grass fills in nicely. (Photo by Charlotte Ekker Wiggins)

This spot was too narrow to plant much but monkey grass fills in nicely. (Photo by Charlotte Ekker Wiggins)

All of these perennial plants have solid green leaves with tiny long, purple flowers.

Earlier this year, I added a new liriope, variegated monkey grass. I like the pop of color lining the flower bed.

In addition to being hardy, I have found some of my honey bees visiting the tiny purple flowers.

They do die back in winter, sometimes leaving a mound of dry leaves by spring. Sometimes I cut them back but most often I leave them to regrow new leaves.

Variegated liriope muscari has white lined green leaves and darker purple flowers. (Photo by Charlotte Ekker Wiggins)

Variegated liriope muscari has white lined green leaves and darker purple flowers. (Photo by Charlotte Ekker Wiggins)

So if you are looking for a hardy, easy to establish border plant, this is it.

Charlotte

September Garden Chores

Keep an eye out for fall plant sales, there’s still growing time before the ground freezes. (Photo by Charlotte Ekker Wiggins)

Keep an eye out for fall plant sales, there’s still growing time before the ground freezes. (Photo by Charlotte Ekker Wiggins)

September Garden Chores

Where has this year gone? Just when I think I am making progress we have much appreciated rain but too much all at once. Have you ever tried to dig holes on a slippery, muddy limestone hillside? I don’t recommend it!

On the other hand, my potted plants are enjoying a much-needed break from record hot temperatures so I will wait until I don’t have to tie a rope around my waist to get things into the ground.

I live in USDA Hardiness Zone 5b/6a and here are some of the other garden chores I tackle in September:

Start cleaning up flowerbeds and vegetable gardens by removing spent plants and saving seeds.  Leave the ragweed to treat the soil, they will die once their work is done.

If you have been fertilizing, it is time to stop. Plants need to start slowing down and get out of the growth they usually pursue through spring and summer, even without the boost of fertilizers. Add a last dollop of compost mixed in the soil and that should be it for this season.

Do keep watering trees and shrubs from now through hard frost. Our first hard frost is usually mid to end of October.

 If you plan to start a new garden next year, this is the time to cover it with cardboard to kill off any current growth.

Good time to start drying favorite herbs for winter use. (Photo by Charlotte Ekker Wiggins)

Good time to start drying favorite herbs for winter use. (Photo by Charlotte Ekker Wiggins)

Bring some of your herbs inside including parsley, chives, rosemary , catnip and stevia. Basil can also be brought inside; sow seeds now to get new plants started for later use. Dry the herbs and store in airtight container.

Good time to move peonies. I have several I buried too deep so when replanting, remember to not bury any more than an inch or two beneath the soil surface.

Daylilies and iris can also be dug up and divided.

Make notes in your garden diary about to dos for next year. Note what plants worked well this year, what seeds you had meant to plant but didn’t get to – whatever you want to tackle next year.

Have favorite annuals? I do, too, and I trim them now before bringing them inside. You can also take root cuttings and start young plants if you have good indoor light. Geraniums, coleus, wax begonias, impatiens all will winter over inside if you keep them pinched and bushy. Geraniums will winter over stored in brown bags without soil.

Order spring bulbs. Daffodils are toxic to deer so they won’t get munched on. Tulips are edible so buy a few for color, then plant them behind a solid wall with wire if you don’t want wildlife snacking on them in the meantime.

If you have left over Amaryllis bulbs, put them in a dry, dark place without water and let them rest for a couple of months. If you want to time when they bloom, pot and water them 6 weeks prior to when you want them in bloom.

Don’t bag and rake clippings, leave them on your lawn to return Nitrogen to the soil.

This is also a good time to stock up on mulch. Buy it in bulk or load up at your local recycling center before they close down for the season.

Start trimming plants you plan to bring inside to overwinter.

Charlotte

Feedlot Panel Arbor

This is a cattle panel bent into an arbor shape and covered in vines. (Photo by Charlotte Ekker Wiggins)

This is a cattle panel bent into an arbor shape and covered in vines. (Photo by Charlotte Ekker Wiggins)

Feedlot Panel Arbor

What can be more homey in your garden than a lovely greenery-covered arbor. Well, maybe an apple tree in late summer like this bless this home lap quilt and wall hanging apple tree but short of that, let’s take a closer look at the arbor idea.

If you have shopped for garden arbors, you know they can be pricey. The last ones I saw on sale started over $200.

What if I told you with a little ingenuity, you can add garden arbors to your garden without breaking the bank.

I have shared the garden arbors I am building in my Missouri hillside pollinator garden made out of cattle panels covered in cedar. However, if you need something smaller, take inspiration from this cattle panel arbor made out of a feedlot panel, which is 16 feet by 34 inches wide.

Built by one of my beekeeping students, this feedlot panel arbor was made by bending the panel in half to form the arch.

Clematis vines grow over the panels, covering the metal and providing shade as one walks under it.

The feedlot panel arbor is secured to the ground with rebar to ensure the panel doesn’t open back up.

The cost? Around $25 for the feedlot panel at your local hardware or farm and home center with another $10 for the rebar.

You can find other panels in various lengths and widths so pick one that will best fit your space.

Once the feedlot panel gets covered by the green, one doesn’t even know what forms the foundation of the arbor.

Are you tempted to make one of these?

Charlotte

How to Dead Head Plants

A dry seed head on a Self Heal herb plant could be removed to encourage more flowers.(Photo by Charlotte Ekker Wiggins)

A dry seed head on a Self Heal herb plant could be removed to encourage more flowers.(Photo by Charlotte Ekker Wiggins)

How to Dead Head Plants

Removing the spent flower heads on plants encourages the plant to produce more flowers. It also makes the plant look nicer and is the fastest way to improve the look of one's garden.

I do dead head plants in spring and early summer. Towards the end of summer and fall, however, I tend to leave the seed heads on so birds will have winter food. Many native plants are a ready source of food for wildlife including black eyed Susans, purple coneflowers, Autumn Sedum and perennial herbs.

Before snipping anything off, take a look at the plant and observe how it grows. Remove the dry seed head and whatever stem portion is dead above a growing bud. This should encourage the plant to grow in a more bushy form and produce more flowers.

One more note on removing spent plant seed heads. For years I used a variety of pruners, taking periodic breaks so that my hands didn't cramp up from all of the repetitive movement.

Traditional pruners can easily clip off plant flower heads. (Photo by Charlotte Ekker Wiggins)

Traditional pruners can easily clip off plant flower heads. (Photo by Charlotte Ekker Wiggins)

Now I have a couple of sewing thread snips dedicated to gardening. These work much faster and easier than pruners and I can rotate between my right and left hand.

A pair of thread snips are easier and quicker to use to dead head plants. (Photo by Charlotte Ekker Wiggins)

A pair of thread snips are easier and quicker to use to dead head plants. (Photo by Charlotte Ekker Wiggins)

Spent flower plant heads can be stored in bags for use next year. They can also be composted.

Charlotte

Dreaded Bush Honeysuckle

Bush honeysuckle can grow very big, these are growing along my road inside city limits.

Bush honeysuckle can grow very big, these are growing along my road inside city limits.

Dreaded Bush Honeysuckle

If I could drive down my lane with my eyes closed, I would. As much as I love anything green and growing, I have a hard time looking at all of the invasive Bush honeysuckle currently in full bloom.

It’s the proverbial dilemma of beauty versus damage to native natural communities. A friend of mine has carefully pruned Bush Honeysuckle shrubs all around her property, only to wonder now why nothing is growing under them but she won’t believe it’s the lovely bush honeysuckle.

The bush honeysuckle flowers look similar to the native fragrant honeysuckle vines.

The bush honeysuckle flowers look similar to the native fragrant honeysuckle vines.

Bush honeysuckle produces a chemical that inhibits everything that grows under and within close proximity to its roots. A native of Asia, Bush honeysuckle produces leaves earlier in the spring and holds on to them late in autumn, giving it a decided competitive advantage over many native plants.

In addition, the Bush Honeysuckle entices birds with their bright red berries, ensuring that their seeds are widely scattered even though the berries themselves don’t offer birds much in terms of food value.

Some communities now sponsor Bush honeysuckle removal days, mobilizing volunteers to yank, pull, cut – whatever it takes – to remove the plants.

You can easily pull young bush honeysuckle out of the ground after a good rain.

You can easily pull young bush honeysuckle out of the ground after a good rain.

I started my own battle against Bush honeysuckle several years ago when a former office colleague came over early spring and helped me cut down the largest bushes. As he cut the larger branches I yanked at the 1-3 year starts, quickly creating a huge pile of greenery that overwhelmed my three empty composters.

I continue the battle, waiting for days after a good rain to walk through my hillside garden and yank at all of the plant starts I can find.

This pile of bush honeysuckle were yanked out of the ground and are now in the compost pile.

This pile of bush honeysuckle were yanked out of the ground and are now in the compost pile.

For those plants that have tried to escape my attention, red yarn decorates their trunks so that they are targeted for removal once my handyman brings his chain saw over for a day. I have my own chainsaw but my brother David made it clear I was not to use it on my own. It’s good advice, I’ve been known to unbeknownst to myself at the time stab myself with a trowel. Or a bread knife.

Missouri Department of Conservation suggests the best time to tackle these plants is fall, after leaves fall, when their sap is receding and one can apply any one of those site-specific weed killers. Since I have honeybees, I don’t use those products on my property, relegating me to the ongoing battle of pulling the plants as often as I can and denying them an opportunity to produce berries.

These plants grow almost everywhere: lake and stream banks, marshes, fens, sedge meadows, wet and dry prairies, savannas, floodplain and upland forests and woodlands.

A recently introduced pest, the European Honeysuckle aphid, somewhat controls flower and fruit production in some of the bush honeysuckles. Heavy bug infestations cause tips of branches to form "witches' brooms" or deformed twigs, often greatly reducing fruit production. Native ladybug beetles, however, have been noted to control the aphids.

Guess this will continue to be my battle as long as I don’t drive myself off the road!

Charlotte

Cloning Roses

These are roses from a florist from a summer wedding I decided to try to clone.

These are roses from a florist from a summer wedding I decided to try to clone.

Cloning Roses

You probably have seen the same videos that caught my attention, ones showing how to clone roses by planting them in potatoes.

I thought about those videos as I was enjoying a friend’s son’s wedding earlier this summer. The table decorations were beautiful bowls of pink and white roses.

Table decorations at my friend Margaret's son's wedding in Kansas City July 2016.

Table decorations at my friend Margaret's son's wedding in Kansas City July 2016.

As I was leaving the wedding venue, I thought why not take this opportunity to see if this cloning process works.

If it does, I could give a cloned rose to the bride as a wedding memento. I also suspected my friend, mother of the groom, would love to have a start.

It would be an unusual but sweet memory of the lovely Kansas City weekend.

I collected the same size water bottles to make little domes over the pots.

I collected the same size water bottles to make little domes over the pots.

I collected a dozen clear plastic water bottles without lids.

I used the same size bottles so I could monitor if there was one type of rose that did better than another one.

I selected a bag of large russet potatoes to feed the rose starts.

I selected a bag of large russet potatoes to feed the rose starts.

I also purchased a bag of large russet potatoes and dusted off a dozen clean plastic pots in a tray.

Rooting hormone should be used separate than the original container so it's not contaminated.

Rooting hormone should be used separate than the original container so it's not contaminated.

Rooting hormone is a staple in my gardening supplies. Best to spoon out a little into a separate container and use that supply instead of dipping straight into the container.

After removing rose leaves, making clean cuts and dusting with root hormone, in they went.

After removing rose leaves, making clean cuts and dusting with root hormone, in they went.

Adding bagged potting soil, I trimmed off rose leaves, dipped the newly-cut rose stems in rooting hormone and eased them into the potato holes before covering with soil and watering.

In some cases, the rose stems were shorter than the recommended 6-8 inches. I used them anyway, making sure growing nodes were covered by soil.

Potted potatoes with rose stems under their clear water bottle domes.

Potted potatoes with rose stems under their clear water bottle domes.

Glitch with Rose Cloning

In researching rose cloning, I discovered a glitch. Some roses offered for sale in the US are patented, which means only the person holding the patent has the right to asexually reproduce the plant.

Much like videos that are copied without permission, rose breeders hold the rights to their registered roses. Cloning the rose, especially for sale, is illegal and denies the rose breeders their rights to make money.

Rose patents are good for 20 years. Any rose introduced within the last 20 years are also probably patented. To stay out of trouble, it is best to only propagate rose varieties that are at least 20 years old.

I don’t have a clue what the wedding roses were. They were provided by a florist, which means they may not be patented and were grown overseas.

Red miniature roses bloom most of the Missouri growing season in my garden.

Red miniature roses bloom most of the Missouri growing season in my garden.

Too bad because I still have old hybrid tea and miniature roses that bloom continuously once they start, adding a lovely scent to my garden.

I also enjoy feeding them a mixture of egg shells, dried banana peels, Epsom salts and dried coffee grounds during their growing season. One of my hybrid teas is more than 30 years old.

After several weeks, I couldn’t wait any longer so I peeked at the plastic bottle-covered pots.

Cloned rose stems in potatoes showing signs of growth - of potatoes!

Cloned rose stems in potatoes showing signs of growth - of potatoes!

Sure enough, it was working. I was growing very green, and very healthy, potatoes!

Have you tried to clone - well, anything from the garden?

Charlotte

Vanishing Tomato Plant

My once robust deck tomato plant all of a sudden looked like it was being eaten.

My once robust deck tomato plant all of a sudden looked like it was being eaten.

Vanishing Tomato Plant

It was a sunny cool early September afternoon. I decided to take a book and join my cat Margaret on my deck chair, one of Margaret's all time favorite things to do. Mine, too, especially when I don't have anything pressing on my schedule. I'm retired now, I thought, I can take a couple of hours to relax and read.

A few minutes later, out of the corner of my eye I saw my once beautiful potted tomato plant vanishing. Most gardeners will confess they may have garden dreams but they often don't realize when they come even close. Our minds are making mental notes spotting something else that needs to be done instead of appreciating what they have accomplished so far. I tried to shut that part of my brain off for a few more minutes but I couldn't concentrate on my book. I had to take a closer look.

Tell-tale skat under my vanishing tomato plant gave me the first clue of what was happening.

Tell-tale skat under my vanishing tomato plant gave me the first clue of what was happening.

The first thing I noticed was that the leaves were now gone from the lush top of the plant. I had just moved the plant to the left a couple of days ago for fear it was too top heavy so I had a very recent impression of how lush it had been.

As I looked closer, I found the culprit. More like culprits, I counted six that I could easily see.

Here's the culprit, a tobacco hornworm, which has a voracious appetite.

Here's the culprit, a tobacco hornworm, which has a voracious appetite.

The tobacco hornworm is one of two caterpillars that can devour a tomato plant on their way to becoming a moth. The tomato and tobacco hornworms are very similar in markings and size but this one is a tobacco hornworm. I had a number of  3-4 inch Carolina moths on my deck earlier this spring so I am guessing these are their progeny.

With our record summer temperatures this year, it appears the caterpillars waited until the temperatures where cooler before hatching and kicking off their metamorphosis cycle. Much like their more flamboyant, and endangered, pollinators, the Monarch butterflies, Carolina moths are part of the family of pollinators that keep plants propagating themselves. Many of those plants are our sources of food.

I have several tomato plants finally having fruit ripen, we can share. I am keeping an eye on my other tomato plants in case those are getting munched on as well. I would still like to have a few fresh tomatoes this year. 

If I decide I have too many, I will freeze the caterpillars and feed them to my birds and frogs.

Have you seen tobacco hornworms on your tomato plants this year?

Charlotte

Rooting Mums

Mum starts can be dusted with root hormone and added to a garden spot to start new plants.

Mum starts can be dusted with root hormone and added to a garden spot to start new plants.

Rooting Mums

Fall must right around the corner because chrysanthemums plants are popping up all over my home town.

The pretty tiny flowers add fall color to a landscape from different tones of yellows to orange, red, white and burgundy. Mums are also being appreciated as garden flowers because they deter bugs. Most of the "natural" bug sprays on the market are made with mum extract so I am going to add a few more mums around my garden to keep bugs at bay.

How to Make New Mums

You can either collect cuttings from your mums or pick up pieces that have been knocked off existing plants.

I was moving a couple of mums and had several pieces that broke off. I made a fresh cut on the bottom, made sure there was one node where leaves were attached; removed the leaves and placed them in water until I could get them into the garden.

Rooting hormone is a staple in my garden supplies, just don't reuse.

Rooting hormone is a staple in my garden supplies, just don't reuse.

Rooting Hormone

One of my garden supply staples is rooting hormone. It helps plants develop roots in soil and is available at most garden and nursery centers.

Pour a little root hormone into a separate container. Dip the mum cutting in water, then dip in root hormone.

I save my root hormone in a little container so that I have it handy to use.

Do not pour root hormone back into original container or you may contaminate the powder.

Make a small hole in soil and insert the root hormone-covered mum cutting.

Make a small hole in soil and insert the root hormone-covered mum cutting.

Place Root Hormone-Covered Start in Soil

Once you have the root covered in root hormone, make a hole in moist soil. Carefully add the root hormone-covered plant in hole and cover.

If soil isn't moist, add water and allow to get moist before you add the plant start.

Cover plant start with moist soil and wait several days for roots to form.

Cover plant start with moist soil and wait several days for roots to form.

Now Wait

Now comes the hard part, waiting. Don't peek or you will dislodge the root hormone from the plant.

I wait a month before I gently tug on the start. If it resists, congratulations you have roots started.

If if comes out of the ground, it didn't take.

The good news with mums is, they are relatively easy to root so it's worth the effort.

Have you tried to root mum starts?

Charlotte

Best Summer Garden Watering Practices

It has been too hot in Missouri to enjoy my favorite summer reading corner on my deck.

It has been too hot in Missouri to enjoy my favorite summer reading corner on my deck.

Every growing area has its own benefits and challenges. Trying to grow anything on the side of a Missouri limestone can be considered foolhardy, maybe even crazy. It certainly has its moments.

Trying to keep plants alive in Missouri's infamous summer has been a personal interest of mine. Not just because I want my plants to survive but because I have learned some hard lessons. Some of the preeminent ones are to be consistent and have patience. The following are some of my tried and true garden watering practices and why.

Best Summer Garden Watering Practices from Bluebird Gardens Quilts and Gifts

In addition to stressing people and pets, Missouri weather temperatures over 90F for several consecutive days stresses plants. In those conditions, plants stop making nectar and pollen, eliminating any possibility of flowers and fruit and frustrating gardening friends aspiring to have perfect lawns. Luckily that’s not me.

I do, however, want my plants to pull through these punishing conditions. Just a decade or so ago, I could predict within days when the hot weather would hit and when I could expect it to start ebbing. No longer. With our climate rapidly changing, weather patterns have become erratic, further stressing plants and challenging their ability to adapt. I have tried to design a low maintenance garden but when it comes to watering, there's no work around. Plants need water to survive.

As we head into the traditional Missouri August dearth, here are 6 out of 12 watering practices to help plants survive:

Bluebird Gardens blackberries burning up in record 2016 hot summer temperatures.

Bluebird Gardens blackberries burning up in record 2016 hot summer temperatures.

Water in Morning

1.     Water only in the early mornings. Although it’s more comfortable to be outside in the evenings, watering at night can encourage fungus, which further stresses plants. Some can even kill a weakened plant.

I have watered at night, especially with sprinklers, when my blackberry bushes appeared to be literally burning up but, note to self - don’t make it a habit!

A watering can simulating rain is less effective than a deep watering wand.

A watering can simulating rain is less effective than a deep watering wand.

Use an Underground Watering Wand

2.     Water with an underground wand; best $20 I have spent in a long time. Underground watering wands are available at most home and garden, and hardware stores.

The 2-foot wand inserted into the ground around plants delivers water at root level. If the tops burn up, the living roots may bring the plants back next year.

Purple coneflower starts sprouting from plants that have burned up in Missouri's record temperatures.

Purple coneflower starts sprouting from plants that have burned up in Missouri's record temperatures.

I have found a number of trees, especially dogwoods, and perennials I thought dead from record heat growing back in the next years. Mark the location of what appears to be a lost plant and then check the same spot next year.

The deep watering wand also comes in handy when I want to chase friends off my deck. Just kidding, checking to see if you were paying attention!

Plastic bottle with holes buried in pot helps water roots.

Water Potted Plants More

3.     Plants in pots need water at least twice, maybe three times a day. The tendency is to sprinkle water from a hose for a few seconds but that will only wet the top of leaves. In record hot temperatures, the trick is to get water to plant roots.

One way to make sure roots get watered is to add plastic bottles with holes buried deep into pots. I prefer the bottles with larger openings, makes it easier to get a hose to the bottle to quickly fill it up. I also have the regular 3/4 inch openings, I just use those as target practice as I aim the hose.

Fertilize Less

4.     Because we are watering so much more frequently, seriously dilute any fertilizer you add. Potted plants do benefit from being fertilized. As we water more frequently, we also wash out the fertilizer we have applied. 

Many potted plants have time release fertilizer in their soil. Those fertilizers also tend to get washed out as we repeatedly water.

Fertilizer exposed to roots will burn and too much fertilizer will stress plants. Potted plants can use enhancing so adding compost is one option.  I now also only add a pinch of fertilizer to a gallon milk jug full of water and make sure it is well mixed before applying. 

Potted plant starts need to be kept watered in record hot temperatures.

Water the Young Ones

5.    No one wants to make a choice between what plants to water, it's reminiscent of having to choose between one's children. However, if you have to choose between new and established plants, water the new ones.

New plants, including ones in pots, haven’t established themselves yet and roots exposed to crisp, dry hot soil will quickly kill them. New plant starts in pots in particular need to be kept moist until you can get them in the ground.

Some herbs, such as rosemary and most mints, seem to thrive in hot weather in my garden so I don't worry too much about keeping their soil moist.

Also make sure the water is getting to the roots. Top watering does little good if the roots aren't kept moist. I will wiggle a finger along a pot edge to make sure water is settling into the middle of the pot. Newly-planted plants will get the watering wand snuck in close to their roots.

More than one inch of welcome rain August 1 2016 at Bluebird Gardens.

More than one inch of welcome rain August 1 2016 at Bluebird Gardens.

Pray for Rain

6. Even with all of the garden watering tips here, the best water for plants is rain. I do keep a close eye on the weather forecast and try to only plant when new arrivals will get a good rain soaking once settled in.

Although I also soak newly-planted plants well with city water, there's no comparison with how plants respond to rain water compared to city water. I now collect rain water in barrels so I can keep watering with the better of the two choices.

Coming up next, more best watering practices to survive this hot summer.  What are you doing to help your plants through these record hot temperatures?

Charlotte

Help Pollinators By Providing Water

Honeybees in a Bluebird Gardens bird bath.

Missouri is setting new heat records this year, a time to be reminded there are ways to help pollinators that doesn't include planting. 

One of the most critical steps gardeners can take is to provide water sources. Pollinators, wildlife, pets - even gardeners - all need water, especially when temperatures are so punishing.

Provide Pollinators Water Sources

Whether it’s a plant saucer with rocks, a bird bath with rocks and sticks, or a tiny concrete swimming hole with safe landing spots, provide a clean, daily water source.

Birds will access water to drink, bathe and keep cool. Butterflies, bats, hummingbirds, moths and bees, both native and honeybees, also need water to stay cool and hydrated. Honeybees carry water back to the hive to share with her sisters.

How Much Water?

Water doesn't have to be deep. If provided in a shallow container, however, check the water level a couple of times a day. Temperatures over 90F quickly evaporate any water sources.

If providing water in bird baths, add rocks and sticks to give small flying pollinators like butterflies, moths and bees a safe place to land.

Next, a reminder on how, and why, to keep plants for pollinators also watered.

Charlotte

How to Pick Blackberries

There are so many fruits available in summer from cherries to watermelon. One of my favorites are so tempting, little dark berries at the tips of arching shrubs available in north America mid-summer. Little does one realize how thorny these plants can be!

Blackberries grow in almost all continents, a plant so flexible it has adopted to a wide range of climates. Regardless of where you are planning to pick them, make sure you are:

  • Wearing a thick pair of pants to catch thorns before they hit skin.
  • Boots if you're walking into a blackberry patch after a rain. Some plants grow shoots that can't be seen above soil but you sure can feel them when you step on them.
  • Don't wear a long sleeve shirt, it will just get caught in thorns.
  • Gloves are optional but if you do wear them, select a pair with good finger dexterity.

When picking, go slowly and focus on berries at the ends, away from thorns. Some berries look ripe but may not be so make sure you have good lighting on the plants.

Worth the effort?

You bet!

Charlotte