Missouri Native Columbine
/
Missouri native columbine lining the path to my front door. (Photo by Charlotte Ekker Wiggins)
Missouri Native Columbine
As my Missouri limestone hillside garden transitions from early to mid-spring, one of my favorite native wildflowers adds delicate color: Missouri native columbine, which appears at about the same time as the first hummingbird scouts return from South and Central America.
According to the Missouri Botanical Garden, Missouri’s native columbine Aquilega canadensis is easily grown in average, medium, well-drained soil in full sun to part shade. I collect seeds, then scatter them in flower beds only to be surprised the following year where they show up on their own.
These native Missouri plants tolerate a wide range of soil as long as drainage is good. I find them growing in rich, moist soils in light to moderate shade.
Remove flowering stems after bloom to encourage additional bloom. Keep soils uniformly moist after bloom to prolong attractive foliage appearance. When foliage depreciates, plants may be cut to the ground.
This Missouri native spring wildflower shows up on rocky woods, slopes, ledges and open areas throughout the State. The perennial plant features drooping, bell-like, 1-2", red and yellow flowers (red sepals, yellow-limbed petals, 5 distinctive red spurs and a mass of bushy yellow stamens). Delicate, biternate foliage is somewhat suggestive of meadow rue (Thalictrum) and remains attractive throughout the summer as long as soils are kept moist. Flowers are quite attractive to hummingbirds.
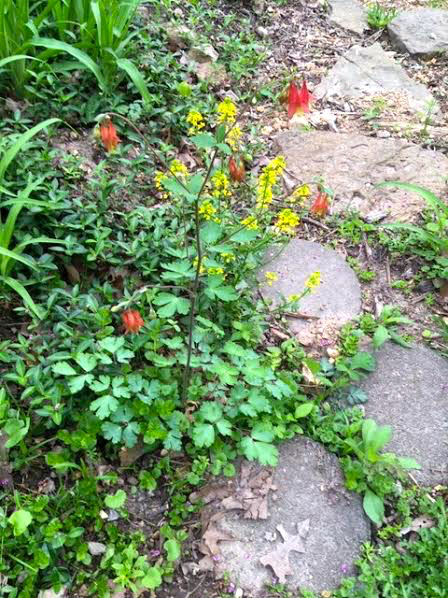
Missouri native columbine with yellow rocket along a path. (Photo by Charlotte Ekker Wiggins)
Genus name comes from the Latin word for eagle in reference to the flower’s five spurs which purportedly resemble an eagle’s talon.
This species has very good resistance to leaf miner which often causes severe damage to the foliage of many other columbine species and hybrids. The leaf miner looks like tiny white or yellowish lines through the leaves.

Missouri native columbine is red with yellow and delicate. (Photo by Charlotte Ekker Wiggins)
Missouri native columbine looks good almost any where it settles - orders, cottage gardens, open shade gardens, woodland gardens and naturalized areas.
Missouri Botanical Garden recommends continuing to water plants after bloom to enjoy the ground cover effect of the attractive foliage. After it yellows, it can be cut to the ground.
I have both hydbrid as well as native columbines in my garden and, of the two, I prefer the delicate native ones. And so do the hummingbirds!
Charlotte