Tree Stump Toadstool

Finally have the proportions right of the top wooden piece, my tree stump toadstool! (Photo by Charlotte Ekker Wiggins)

Finally have the proportions right of the top wooden piece, my tree stump toadstool! (Photo by Charlotte Ekker Wiggins)

Tree Stump Toadstool

So I do have a chain saw but I am not allowed to use it with good reason. I have a weak, broken right wrist which sometimes pinches and makes me drop things so not good to be wielding a piece of machinery that could take out a limb. Or two.

However, I have tree stumps where someone else wielded a chain saw and left tree remnants in various garden spots. Enter this one particular stump that now sits in the middle of one of my hillside flower beds.

I have used this tree stump for a variety of uses from holding a plastic pot bottom full of water for my nearby bees to a summer plant stand. None of them seemed to fit the bill so I started looking for a piece of wood I could place on top.

The initial idea was to use something that would make this old tree stump into a garden table but I found a wonderful cut down piece that in proportion has turned the cut down tree stump into a favorite busy garden visitor, toadstool. It helps that the top wooden pieces is a different color than the light gray bottom, encouraging the toadstool vibe.

Whenever I walk by, I smile so I know this is the right top for the tree stump.

Now on to the next one!

Charlotte

Darling Daylilies

These are descendants from the original immigrant daylilies. (Photo by Charlotte Ekker Wiggins)

These are descendants from the original immigrant daylilies. (Photo by Charlotte Ekker Wiggins)

Darling Dayliies

We don’t appreciate them as much as European settlers, who among their few possessions made room for Hemerocallis fulva, today’s common orange daylily, when they first arrived in North America. How did we forget how valuable these plants used to be?

When I worked for several weeks in Southampton for the 50th Anniversary of D-Day, several of our English counterparts talked about their tiny gardens. One of the staple plants they continue to grow in their kitchen gardens is daylilies because all parts of the plant are edible.

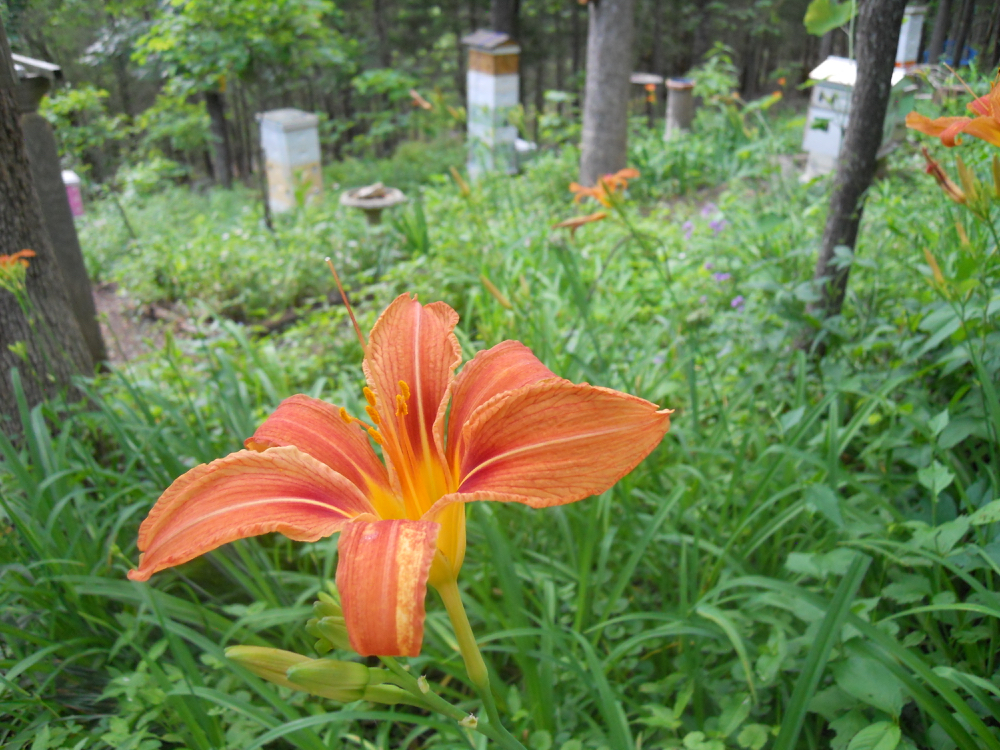
I didn’t know that when I first admired the beautiful orange blooms. I did know they were almost impossible to kill and grow in almost all conditions. When my husband at the time and I had a house built, I used them to hold in the soil we brought in. Some areas today still have the descendants of those first plants, considered a Missouri native wildflower, so thick now I need to thin them out again if I am going to see flowers in that part of the Missouri limestone hillside garden again.

Daylilies Are Edible

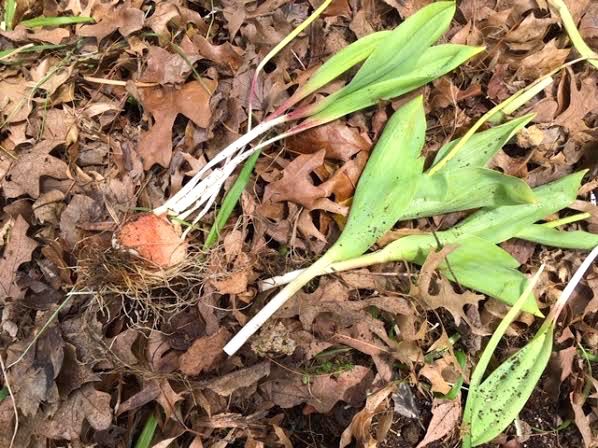
I have since learned why daylilies are so darling, they are delicious. Jan Phillips in her book "Wild Edibles of Missouri" calls orange daylilies "another one of mother nature's grocery stores." Phillips confirms the whole plant is edible, from the young flower stalks in spring that taste like asparagus to the tiny, white root bulbs reminiscent of radishes.

The steamed stalks are referred to as the poor man’s asparagus, something I once again forgot to try this year when the stems were young enough.

Don Kurz in his field guide to “Ozark Wildflowers” said these plants have been “eaten in salads, in fritters, as a cooked vegetable and as a seasoning. In China, a root tea is used as a diuretic.”

There is also a cautionary note. “Recent Chinese reports warn that the roots and young leaf shoots are considered potentially toxic and can accumulate in the body and adversely impact the eyes, even causing blindness in some cases. Their studies also warn that the roots contain a carcinogen.”

I like the fresh flower buds. They are a nice addition to a salad or served on their own as a side dish. They taste like green beans with a hint of onion and brighten up any dish when you add an open flower.

Another way to enjoy the buds is to steam them. It only takes a couple of minutes to make the buds wilt so keep a close eye on them so they are not overcooked.

One of the more popular recipes is to fry the buds. If you want to try, use a flour dip in an egg wash in hot oil for only a minute or so, they cook quickly.

If you are going to eat daylilies, make sure you are picking them from a chemical-free area. Wash in cool water, then allow to dry. I keep them on their stems in a flower vase with water until I use them.

You don’t have to eat them to enjoy them, they are beautiful just as they are. Hemerocallis means "beauty for a day."

Charlotte

Self-Heal Mo Wildflowers

Self Heal is actually a mint and easily grows on my Missouri hillside. (Photo by Charlotte Ekker Wiggins)

Self Heal is actually a mint and easily grows on my Missouri hillside. (Photo by Charlotte Ekker Wiggins)

Self Heal Mo Wildflowers

Self-Heal loves lawns and gravel driveways, or at least my gravel driveway. It attracts bees and butterflies when flowering and is edible. Self-Heal, as the name suggests, was once a sought-after medicinal herb by herbalists and country folk alike.

I met Self-Heal on my Missouri limestone hillside garden a couple of decades ago. I didn’t like walking over it or even weed eating it, so I started to transplant the seedlings to edges of garden beds, where it has nicely established.

Self-Heal grows in many countries around the world and it loves disturbed areas. Habitats include moist to mesic black soil prairies, alongside rivers and lakes, meadows, thickets, forest openings, woodland borders, pastures, and abandoned fields. Self-Heal that is common in lawns is suspected to be a Eurasian variety. This means it is shorter and it has roots at the nodes of the leaves.

According to Edible Wild FoodSelf-Heal is edible and medicinal. The leaves and flowers contain high levels of antioxidants (which prevent cancer and heart disease). It has been used for centuries as medicine. Raw self-heal leaves are edible, suitable as a pot herb and have a subtle bitter taste. Although they taste better cooked, a lot of the nutrients are lost (as they are in vegetables as well) in this process. Toss leaves onto a salad, in a soup or stew or once you have mashed potatoes, add them to this. A cold water infusion of freshly chopped (or dried) leaves makes a nourishing drink. (Boil water to make tea as well.) This is a plant that can help many health ailments.”

Here is a patch of Self-Heal I helped to establish along a flower border several years ago. The plants are now mature and grow about 18 inches high.

Here’s one of the self heal bunches along one of my paths. (Photo by Charlotte Ekker Wiggins)

Here’s one of the self heal bunches along one of my paths. (Photo by Charlotte Ekker Wiggins)

As I have said, Self-Heal likes my gravel driveway so I took to the flower bed edges to find Self-Heal starts.

The leaves are easy to identify since they extend above the root on short stems.

These are self heal starts sprouting in my gravel driveway. (Photo by Charlotte Ekker Wiggins)

These are self heal starts sprouting in my gravel driveway. (Photo by Charlotte Ekker Wiggins)

After a rain, Self-Heal starts can be gently pulled out of soft ground to transplant.

Once I have a handful, I use a weed puller to make holes in the new growing area and tuck Self-Heal starts in.

These self heal starts are moving to other parts of my garden. (Photo by Charlotte Ekker Wiggins)

These self heal starts are moving to other parts of my garden. (Photo by Charlotte Ekker Wiggins)

One of my Missouri native wildflowers book says this plant is also called “Heal All.” Who wouldn’t want that sort of help from a garden?

Charlotte

Tree Stump Bird Bath

Repurpose tree stumps into bird bath pedestals. (Photo by Charlotte Ekker Wiggins)

Repurpose tree stumps into bird bath pedestals. (Photo by Charlotte Ekker Wiggins)

Tree Stump Bird Bath

Thanks to an infestation of emerald ash borers, I have had to cut down some of the ash trees on my Missouri limestone hillside garden.

Since I have several stumps I continue to trip over, I decided this time I would leave some of the tree stumps as short pedestals. While I considered what I could put on top of them, I have found lizards sunning themselves; squirrels eating nuts and, a couple of times, a hive tool I rested on the stump then forgot where I put it.

This time of year I have a lot of songbirds nesting around my garden so I decided to add a bird bath to one of the stump pedestals. The idea to attach a bird bath to one of these tree stumps was inspired by this make shift bee bar. It’s the green plastic pot bottom that has now sat on this old tree stump for a couple of years while providing nearby honey bee colonies with water.

This make shift bee bar inspired me to try a bird bath on another tree stump. (Photo by Charlotte Ekker Wiggins)

This make shift bee bar inspired me to try a bird bath on another tree stump. (Photo by Charlotte Ekker Wiggins)

Since the destination tree stump was much smaller, I took inspiration from another garden item, this very old hanging bird bath.

The hanging birth bath has a wooden base and plastic shallow bowl that sits inside.

These hanging bird baths can easily be repurposed on tree stumps. (Photo by Charlotte Ekker Wiggins)

These hanging bird baths can easily be repurposed on tree stumps. (Photo by Charlotte Ekker Wiggins)

The hanging bird bath cost around $11. I made sure the plastic insert was tied down to the wooden part by wearing galvanized wire through the hanging holes.

Tie down the blue plastic birdbath to the bottom. (Photo by Charlotte Ekker Wiggins)

Tie down the blue plastic birdbath to the bottom. (Photo by Charlotte Ekker Wiggins)

The galvanized wire was woven through the bottom and into the next plastic insert hole.

After wiring, don’t forget to level the bird bath. (Photo by Charlotte Ekker Wiggins)

After wiring, don’t forget to level the bird bath. (Photo by Charlotte Ekker Wiggins)

The wooden piece was nailed into place before I wove the galvanized wire. Once the blue insert was tied down, the new bird bath was done.

Once weathered, the cedar surround will turn grey. (Photo by Charlotte Ekker Wiggins)

Once weathered, the cedar surround will turn grey. (Photo by Charlotte Ekker Wiggins)

Now to find an interesting rock to place in the middle but it has to be small. Not sure birds will want to take a bath in something that takes up space!

Charlotte

Wild Bergamot Bee Balm

Doesn’t this flower look like something Dr. Seuss would have drawn? (Photo by Charlotte Ekker Wiggins)

Doesn’t this flower look like something Dr. Seuss would have drawn? (Photo by Charlotte Ekker Wiggins)

Wild Bergamot Bee Balm

When I first moved into my Missouri limestone property, the hillside was covered in Wood Sage and Wild Bergamot, also called Horsemint and Bee Balm. Over the years, I have been coaxing both perennials back into my garden, marking spots where I know they have grown in the past and leaving nearby areas undisturbed.

Wild Bergamot, or Bee Balm, is a mint and looks like something Dr. Seuss would have drawn. The pink topknot holds the petals around a round seed head, fun to watch bobbing in wind. If you were a fan of The Muppets TV Show, you can easily join me in imagining these flowers in one of those sketches!

Wild bergamot making a return to my hillside garden. (Photo by Charlotte Ekker Wiggins)

Wild bergamot making a return to my hillside garden. (Photo by Charlotte Ekker Wiggins)

Wild bergamot and the more cultivated Bee Balm s a popular and showy perennial. Clusters of lavender, pink or white flowers, looking like ragged pompoms, bloom atop 2-5 ft., open-branched stems. 

This Missouri native perennial has aromatic leaves used to make mint tea. Oil from the leaves was formerly used to treat respiratory ailments.

The plant was named in honor of a 16th century Spanish physician and botanist, Nicolas Bautista Monardes (1493-1588). Monardes never went to the Americas but was able to study medicinal plants in Spain because Spain controlled navigation and commerce from the New World.

Wild bergamot looks like a tall mint. (Photo by Charlotte Ekker Wiggins)

Wild bergamot looks like a tall mint. (Photo by Charlotte Ekker Wiggins)

Wild Bergamot makes a good cut flower and a nice addition to a bouquet of wildflowers. The unusual flower shape easily makes it stand out.

Now excuse while I go back to my garden, I see another Wild Bergamot patch I want to encourage to grow!

Charlotte

Repurpose Rose Bush Ties

Rose bush ties.jpg

Repurpose Rose Bush Ties

If you buy plants that are bagged, such as bare foot roses, you will find lovely metal ties holding the top of the bags closed.

Those metal ties are wonderful garden helpers and because they are metal, easy to reuse.

The first purpose was tying up some errant raspberry starts. These were inching out of their bed and threatening to cover my strawberries so I moved them away from shading the strawberries.

Rose tie raspberry.jpg

Another great use for these metal rose bush ties is to anchor new trees to a post. This is a dwarf fruit cocktail tree that was leaning a little to the left. I added a metal stake and tied the tree to it so that it will continue to grow much straighter.

Rose tie branch.jpg

The nice thing about these ties is that they allow room for the plant tied up to grow. I can also easily re-attach the metal ties when I need to do so and they won’t melt in rain. The twine I have been using to tie up my rosebud trees only lasts a few months. Luckily I don’t need to keep those trees tied up for long before they start growing vertically.

In USDA Hardiness zone 5b/6a roses tend to be sold only through spring so remember this tip next year when you add a few bare root roses to your garden. If you don’t want to wait that long, pick up this Garden Flowers Lap Quilt on sale and I will include a few free rose bush ties you can use this year!

Charlotte

Rose Grades

Bare root roses have their grade noted on the bag. (Photo by Charlotte Ekker Wiggins)

Bare root roses have their grade noted on the bag. (Photo by Charlotte Ekker Wiggins)

Rose Grades

Have you ever picked up a package of bare root roses and wondered what the number grades mean? The good news is that the rose Industry has established standards to help growers, and consumers, better know what they are buying. Those standards translate into grades, with the lowest number being the most expensive, Grade 1, to the less well-established roses at grade 2.

To us as consumers, Grade 1 roses are the most expensive and the ones we can expect to fully bloom the year they are purchased. These are also the newly launched roses.

Grade 1.5 are roses that can use a full year of growing before they are fully in bloom. They also tend to be the older, tried and true roses.

The other mark I look for in my roses is the American Rose Society emblem. Established in 1892, the society funds research and education as well as the ratings that help us all in our rose purchases.

The American Rose Society publishes a guide shared with its members rating the named roses. The higher the score the better the rose. I joined the society a few years back and have one of the booklets around here somewhere. The ratings can be misleading because a rose featured at the Portland Rose Festival may not do as well here in Missouri in USDA Hardiness Zone 5b/6a.

I do look for the American Rose Society Symbol more to assure myself I am buying a good established rose.

The other factor that is important to me is scent. I want roses that speak to me with their fragrance, be it spicy or just a heady odor that can fill up a room. Most roses today will note whether the rose is fragrant on the label.

Here’s one of the bare root roses getting a good start. (Photo by Charlotte Ekker Wiggins)

Here’s one of the bare root roses getting a good start. (Photo by Charlotte Ekker Wiggins)

Finally, here is the ranking of rose bush sizes. In mid-Missouri, the miniatures, which are a small shrub rose, have done well for me so I am adding a few more shrub varieties for my bees. And me.

Miniature (1 ft)

Floribunda (2-4 feet)

Hybrid Tea (3-5 feet)

Grandiflora (4-6 feet)

Shrub (4-6 feet)

Roses are edible and make lovely salad and plate garnishes, just make sure you are picking them from an area that hasn’t been treated with chemicals or pesticides.

Missouri is well-known for its clay and hot summer weather. Planting roses should work if we can amend soil with compost to give the roses the nourishment they need and provide them with air conditioning.

Well, one out of two isn’t bad.

Good reason to have a back up around, like this vintage roses quilt. No watering required!

Charlotte

Ox-eye Daisies Or...

All flowers should have bugs as visitors! (Photo by Charlotte Ekker Wiggins)

All flowers should have bugs as visitors! (Photo by Charlotte Ekker Wiggins)

Ox-eye Daisies

Ox-eye Daisies Leucanthemum vulgare (formerly Chrysanthemum leucanthemum) were the first Missouri wildflowers I learned to identify before they were blooming. There was a field of them behind where I was living so I waited for them to die back and took note of what their rosette shape looked like so I could transplant some the following year.

Although identified as a Missouri wildflower, Ox-eye Daisies were introduced to North America from Eurasia. Others include dandelion, shepherd's purse, salsify, and henbit.

Ox-eye Daisies are herbs and the original plant that was bred to produce the more popular, and well-behaved, Shasta Daisy.

Ox-eye Daisies can be invasive and easily take over an area, which earns them the moniker of weed. I love seeing them along road sides and in my garden, they are very happy flowers and undoubtedly inspired me to carry this crochet daisies lap quilt throw.

The Ox-eye Daisy patch next to my mail box. (Photo by Charlotte Ekker Wiggins)

The Ox-eye Daisy patch next to my mail box. (Photo by Charlotte Ekker Wiggins)

Interestingly enough, this perennial is edible although I have to confess I haven’t tried them. Yet.

As I was looking at what was visiting this personal favorite, I spotted another, smaller white daily-like flower. Can you spot it?

(Hint. Bottom left)

But are all of those daisies Ox-Eye Daisies? (Photo by Charlotte Ekker Wiggins)

But are all of those daisies Ox-Eye Daisies? (Photo by Charlotte Ekker Wiggins)

Philadelphia Fleabane Erigeron philadelphicus looks similar to Ox-eye Daisies but the white petals look more like someone took a pair of scissors and cut up the petals into a fringe. Philadelphia is considered a native Missouri wildflower and is a favorite food source of many of Missouri’s native bees including mason bees, small carpenter bees and cuckoo bees.

The more fringy daisies are Philadelphia fleabane. (Photo by Charlotte Ekker Wiggins)

The more fringy daisies are Philadelphia fleabane. (Photo by Charlotte Ekker Wiggins)

Philadelphia Fleabane flowers are also about half the size of Ox-eye Daisies so it’s easy to distinguish them when sitting together in a field.

Can you tell the difference in this photo? (Photo by Charlotte Ekker Wiggins)

Can you tell the difference in this photo? (Photo by Charlotte Ekker Wiggins)

Both flowers are simply white flowers with yellow centers but both are nice hosts to a number of insects, which means they have a nicely established job in our garden’s ecosystems.

Edible Addibles

One more thing about Ox-eye daisies. Did you know they are edible? You can sprinkle the white petals on a salad. According to Jan Philips, the green leaves can also be added to a salad and may be “an acquired taste.”

I suspect some people are still trying to get over that they can eat Ox-eye Daisies.

Charlotte

Bush Honeysuckle Removal

Bush honeysuckle has flowers very similar to the honeysuckle vine. (Photo by Charlotte Ekker Wiggins)

Bush honeysuckle has flowers very similar to the honeysuckle vine. (Photo by Charlotte Ekker Wiggins)

Bush Honeysuckle Removal

It’s time to tackle one of the more invasive shrubs in Missouri, bush honeysuckle. May-June is when they flower so that helps in identification although their gray stems are also a dead giveaway.

According to Missouri Department of Conservation, bush honeysuckle are large, upright, spreading shrubs reaching up to 15–20 feet in height, with flowers that change from white to yellow, juicy red berries, and opposite, simple leaves that green up much earlier than surrounding native vegetation.

Leaves are deciduous, opposite, simple, 1–2½ inches long, narrowly oval with the tip abruptly pointed, the margin entire (not toothed or lobed); upper surface green, lower surface pale green and fuzzy. In late autumn, leaves typically remain green and attached well after the leaves of our native trees and shrubs have fallen.

Bark is grayish brown, tight, with broad ridges and grooves.

Twigs are grayish brown, thornless; often the older branches are hollow.

Flowers May–June, fragrant, in clusters from the leaf axils, tubular, 1 inch long, slender, distinctly 2-lipped, with upper lip having 4 lobes, lower lip with 1 lobe. Petals change from white or pink to yellowish as they age.

Fruits mature in September–October; typically red berries about ¼ inch across, 2–6 seeded, in pairs in the axils of the leaves.

Another tell is that butterflies will visit honeysuckle vines but not touch bush honeysuckle.

Here’s what it looks like fully established:

Full grown bush honeysuckle has grey striated stems. (Photo by Charlotte Ekker Wiggins)

Full grown bush honeysuckle has grey striated stems. (Photo by Charlotte Ekker Wiggins)

One of the problems with bush honeysuckle is that it kills everything growing under it, eliminating other native plants and shrubs.

Native plants and shrubs provide food for native insects and pollinators, some that depend on specific plants for their food and survival.

Our recent spring rains gives us all a chance to easily remove bush honeysuckle stars like this one:

Small bush honeysuckle starts are easy to remove. (Photo by Charlotte Ekker Wiggins)

Small bush honeysuckle starts are easy to remove. (Photo by Charlotte Ekker Wiggins)

Rain softens soil and makes it easy to pull the bush honeysuckle starts straight out of the ground, roots and all.

Pull bush honeysuckle starts after a rain. (Photo by Charlotte Ekker Wiggins)

Pull bush honeysuckle starts after a rain. (Photo by Charlotte Ekker Wiggins)

The larger, established bush honeysuckle plants should be cut in fall and treated with vinegar to kill the plant.

Don’t use a weed eater to cut off the top of the new bush honeysuckle plants, that will make the stem hardier and more difficult to pull out later.

I have been clearing my one acre hillside for the past 5 years and have one patch at the bottom of the acre to still clean out.

Guess what I will be doing as soon as the sun comes out again!

Charlotte

Planting Tomatoes

A little stash of tomatoes ready to be planted. (Photo by Charlotte Ekker Wiggins)

A little stash of tomatoes ready to be planted. (Photo by Charlotte Ekker Wiggins)

Planting Tomatoes

We had several local plant sales over the weekend, an excellent time to stock up on tomato plants. Not that I need too many, my favorite cherry tomatoes tend to volunteer in nearby plant pots so all I need to do is look for their tell tale leaves.

This year I decided to treat myself to three other tomato plants; a Better Boy, an all time large tomato favorite; a Brandywine which I have never grown before and an heirloom variety.

I grow my tomatoes in large pots along my retaining wall steps so I can easily manage and maintain them. After filling the planting pots with new potting soil around buried holy plastic bottles so I can water roots, I added crushed up egg shells to the bottom of the planting hole. The dried egg shells will provide the plants with the calcium they need. Half a shell per plant will do nicely.

Each pot was also given a scoop of compost from one of my composters. This compost cooked over winter and turned a lovely dark brown, a sure sign that it is ready to be used. I mixed it up so the compost is spread through the soil. The compost will provide extra nutrients to soil microorganisms that help keep the tomato plants healthy.

Add dry egg shells to the bottom of your planting holes. (Photo by Charlotte Ekker Wiggins)

Add dry egg shells to the bottom of your planting holes. (Photo by Charlotte Ekker Wiggins)

Why yes, I do have gardening gloves but it’s hard to take a picture with them on. You will have to believe me that I used the gardening gloves as I made the planting holes, mixed compost and added egg shells.

Finally, a step I forgot to take last year. Add a tomato cage now, when the plants are small and you can easily get the cage over them.

Last year, I waited until late June to cage them and I had to literally wrestle the plants into the metal frames, loosing some branches in the process. It’s much easier to do it now.

Add a tomato cage now or you may forget. I do! (Photo by Charlotte Ekker Wiggins)

Add a tomato cage now or you may forget. I do! (Photo by Charlotte Ekker Wiggins)

As a natural bug deterrent, I added basil plants to each of the tomato pots, two per plant. I will keep them pinched so they bush as they grow, giving me not only fresh basil but repelling bugs.

One last addition, basil to keep bugs at bay. (Photo by Charlotte Ekker Wiggins)

One last addition, basil to keep bugs at bay. (Photo by Charlotte Ekker Wiggins)

Now the fun part, watching them grow. I love going out into my garden every morning to see what is growing, blooming and changing. Tomato plants usually grow fast so their changes are interesting to watch.

By the way, honeybees don’t pollinate tomato plants, bumblebees do. Luckily I have seen quite a few in my garden already this spring so the tomato plants will have good company.

Charlotte

Remember to Water

Basic planting supplies should include a watering can. (Photo by Charlotte Ekker Wiggins)

Basic planting supplies should include a watering can. (Photo by Charlotte Ekker Wiggins)

Remember to Water

I was at one of my favorite yearly plant sales when one of the ladies said she just had someone complain that the plants she purchased last year didn’t make it.

“Did you water them,” the lady asked the customer.

“No.”

And once again, someone who may have claimed to have a brown thumb is revealed to have forgotten a basic requirement when planting: water.

Note to all shoppers at Gardeners of the Forest City plant sale. (Photo by Charlotte Ekker Wiggins)

Note to all shoppers at Gardeners of the Forest City plant sale. (Photo by Charlotte Ekker Wiggins)

One of the reasons I like to plant in spring is that I can time the work around spring showers. Rain provides so many more benefits to plants than we may realize; the newly-oxygenated water can saturate soil and fully moisturize it making soluble nutrients available to soil microorganisms.

In addition, city water contains fluoride which inhibits plants from taking up nutrients.

When looking at soil composition, 25% of all soil is water so to keep soil in balance, it should get about 1” of water a week.

No need for a watering can, you can also repurpose a one gallon milk jug. (Photo by Charlotte Ekker Wiggins)

No need for a watering can, you can also repurpose a one gallon milk jug. (Photo by Charlotte Ekker Wiggins)

When I am getting ready to plant, I always carry a water source with me, either a watering can or a recycled milk jug, that way I won’t forget to add water before I move on to the next project.

In summer, when temperatures are much hotter, I used an underground watering wand to keep plant roots moist.

The bottom line is when you plant, water. You may be amazed at how quickly a black thumb will turn green!

Charlotte

How to Manage Dying Spring Bulbs

Daffodils and purple tulips are now fading in my garden. (Photo by Charlotte Ekker Wiggins)

Daffodils and purple tulips are now fading in my garden. (Photo by Charlotte Ekker Wiggins)

How to Manage Dying Spring Bulbs

Frankly I cringe when I see people mowing down, or worse, pulling out, their tulip bulbs and cutting off the top greenery. Granted once bloomed, tulip and daffodils are on the down side of pretty, leaves turning yellow as they shrivel up and melt into the landscape. That is precisely the point; they should be allowed to gently fade away.

In the process, these bulbs, as most other plants, are still taking in sunlight they turn into energy that gets stored in bulbs. The energy then is taped next time they grow and, if they have enough, they will bloom again.

Tulips, daffodils and other spring-blooming plants need to collect the energy through their leaves if they are going to have enough energy to bloom again. Without it, they will use up whatever energy they have stored and either just grow leaves next year, or die.

I understand the remaining greenery is not attractive so what to do about the ugly greenery. I plant other flowers in front and around the daffodils and tulips so they will grow and overtake, or cover up, the yellowing leaves.

Daffodil leaves are turning yellow as they die back. (Photo by Charlotte Ekker Wiggins)

Daffodil leaves are turning yellow as they die back. (Photo by Charlotte Ekker Wiggins)

If you want to save the bulbs, dig the up with the greenery still attached. The plant may continue to grow after it is out of soil so keep their version of being solar powered available to the plant or it may die.

These tulips, for example, can be moved after blooming as long as the green tops are left attached to the bulbs. If you cut them off, the bulb has no way to collect sunlight and, through photosynthesis, turn it into energy and food it stores in the bulb.

Tulip bulbs depend on leaves to provide bulbs food. (Photo by Charlotte Ekker Wiggins)

Tulip bulbs depend on leaves to provide bulbs food. (Photo by Charlotte Ekker Wiggins)

The same applies to mowing them over, cutting off the greenery, walking across it - anything that detaches the solar panels of a plant, the leaves, from their storage area - the bulbs.

Even if you don’t have anything to camouflage the yellowing leaves, the dying off process will take a very short time so be patient!

Charlotte

Cat Hair for Birds Nests

The first cat hair offering disappeared in less than a day. (Photo by Charlotte Ekker Wiggins)

The first cat hair offering disappeared in less than a day. (Photo by Charlotte Ekker Wiggins)

Cat Hair for Birds Nests

Do you have long-haired pets? I have one cat and, over winter, I save the hair from her daily brushings to give to birds for their spring nests.

There have been a number of suggested bird nesting materials and some are do nots: aluminum, plastic, human hair, yarn and dryer lint. Also on the do not use list are string and dog hair. The best nesting material I have found to date is the long cat hair. It lasted less than a day in the repurposed suet feeder, now refreshed with a second batch.

Suet holder has been re-filled with another batch waiting to be added. (Photo by Charlotte Ekker Wiggins)

Suet holder has been re-filled with another batch waiting to be added. (Photo by Charlotte Ekker Wiggins)

Later this year I will check birdhouses and look for tufts of cat hair sticking out of nexts and birdhouse corners.

The cat fur is a favorite because it is very soft and warm, giving the nest extra insulation and protection.

To save your long haired cat fur, clean your brush after every brushing session. Clean your winter suet holder before filling with pet fur, then hang back on a tree.

If you can watch the suet holder, periodically check it and you may catch a bird helping themselves to the fur.

Charlotte

Secret to Bare Root Plants

Bare root Itoh peonies are getting a start first in a container. (Photo by Charlotte Ekker Wiggins)

Bare root Itoh peonies are getting a start first in a container. (Photo by Charlotte Ekker Wiggins)

Secret to Bare Root Plants

It’s that time of year when gardeners dreams turn to buying bare root plants because they are less expensive, or something they can’t easily find locally. Or maybe you get a bare root tree for Arbor Day, or as a store giveaway at your local home and garden center. Regardless of how you get them, there is a simple secret to getting bare root plants to grow.

You need to pot them first.

That’s right, no planting directly into your garden this first year. Instead, get them in pots with potting soil and let them grow in the pot for the first year. What the plant is doing is establishing roots, which will ensure the plant survives when you transfer it into its final growing spot.

A number of friends have bought bare root plants from places like George O. White Nursery in Licking, Mo., one of my favorite places to get local native plant stock. The prices are hard to beat, the most expensive tree seedling is 90 cents per seedling, and the price goes down as you buy in larger quantities.

However, you don’t want to take those seedlings and plant them straight into your garden or landscape. The roots need a little more time developing so once you get the bare root seedling, get them into a pot. Make sure the pot is about twice the size of the current root structure to give it room to grow.

This bare root dwarf fruit tree is getting a start in a pot. (Photo by Charlotte Ekker Wiggins)

This bare root dwarf fruit tree is getting a start in a pot. (Photo by Charlotte Ekker Wiggins)

And be patient. It can take a little time for new seedlings to get used to their new environment, which is why I use plain potting soil, not soil with added fertilizer. I can then monitor how the plant is doing and add my own fertilizer as I see fit.

How do you know if the plant is settling in?

New green growth is a sure indication the plant is settling in. (Photo by Charlotte Ekker Wiggins)

New green growth is a sure indication the plant is settling in. (Photo by Charlotte Ekker Wiggins)

Green growth along the trunk nodes is one good sign. And don’t be discouraged if you don’t see much growth this first year above ground, with the right conditions most of the energy should be going into root development.

I leave my seedlings in pots through the growing season, then add them to my garden in fall or the next spring. I keep an area that I call my nursery and plop the plants, pot and all, in the nursery to winter over there if I haven’t moved them to their permanent location.

And don’t forget to water them. Since they are now in pots, they may need water more frequently than the established plants in your garden.

You will know they are ready to plant in the garden when the tree seedlings are looking more like the Tree of Life lap quilt.

Charlotte

My Hardy Geraniums

My favorite geraniums are these raspberry-colored ones. (Photo by Charlotte Ekker Wiggins)

My favorite geraniums are these raspberry-colored ones. (Photo by Charlotte Ekker Wiggins)

My Hardy Geraniums

As you think about what plants you want to have in pots this year, make sure you include geraniums. I have had a variety of different geranium colors in pots for many years, giving me wonderful color in the dead of a dreary winter.

Most geraniums offered on the market are annuals, and it is assumed they will be planted one year and allowed to die when cold weather sets in. Even if you have them planted in your garden, you should be able to dig them up and move them inside in pots to continue growing, and blooming, through winter.

The raspberry-colored geranium in the top photo is my favorite. The plant is now 4 foot tall and lives in my business office, keeping my printer and desk company through the year. It tends to bloom most of the year taking a short break around fall.

I do give them watered down fertilizer, 1/2 tsp per gallon of water every other month, and worm castings a couple of times a year mixed into the soil. I remove the top soil, mix in the worm castings, then replace it all back into the pot. Every three years or so I remove as much soil as I can and replace it with new soil.

This next geranium is blooming in living room pot. Its red color pops nicely against the purple leaves, a beacon among the sea of plants wintering over in the bay window. The red color compliments the red in the amaryllis blooms currently in bloom.

These red geraniums are pretty among the purple leaves. (Photo by Charlotte Ekker Wiggins)

These red geraniums are pretty among the purple leaves. (Photo by Charlotte Ekker Wiggins)

One more reason why you should save at least one geranium for winter. This is a tomato red geranium blooming in another pot in my dining room, brightening up the area on cloudy, gray days.

Tomato red geraniums in bloom in my living room. (Photo by Charlotte Ekker Wiggins)

Tomato red geraniums in bloom in my living room. (Photo by Charlotte Ekker Wiggins)

Now these geraniums are different than the native, hardy geraniums. Even though they are only annuals with a little care they can bloom year after year if you keep them inside over winter.

Here’s another way to bring in these colors to your room, our Ribbon Flowers Lap Quilt will add the same colors to the back of a chair or sofa and be ready for that unplanned nap!

Charlotte

Daffodil Bouquets

Most of these daffodils where picked in bud form. (Photo by Charlotte Ekker Wiggins)

Most of these daffodils where picked in bud form. (Photo by Charlotte Ekker Wiggins)

Daffodil Bouquets

There are few things that brighten up a room than a bouquet of spring-growing yellow gold daffodils, these remind me of our Yellow Gold Double Wedding Ring Quilt.

To have longer lasting inside bouquets, pick the daffodils when they are still in bud. Once exposed to the warmth of a room in a flower vase with water, the buds will open into flowers and give you a longer-lasting display.

These daffodil buds are excellent cut flower candidates. (Photo by Charlotte Ekker Wiggins)

These daffodil buds are excellent cut flower candidates. (Photo by Charlotte Ekker Wiggins)

When cutting daffodils, leave at least one flower bud so you will know what type and colors that group of bulbs produce.

I also only pick one or two buds from each group so I can also enjoy the flowers in bloom outside as well as cut flowers inside.

Daffodils don’t play well with other flowers so don’t mix your daffodil bouquets with other flowers straight out of the garden. If you want a blend, let the cut daffodils sit in water by themselves for a good 24-48 hours. The toxins in daffodils that deter deer will drain and then you can mix them with other flowers.

Large King Alfred in the back and small Tete-A-Tete daffodils in front at Bluebird Gardens, (Photo by Charlotte Ekker Wiggins)

Large King Alfred in the back and small Tete-A-Tete daffodils in front at Bluebird Gardens, (Photo by Charlotte Ekker Wiggins)

Also take clippers with you when cutting daffodils out of the garden. The clippers will give you cleaner cuts and you won’t have to tug at the green stem to easily remove it. Keep the green leaves on daffodils so the leaves can collect sunlight and, through photosynthesis, translate it into energy they store in bulbs for use next year.

Finally change the water in the vase every couple of days and recut the stems to give your daffodils a long life inside.

King Alfred daffodils are the largest daffodils currently on the market. (Photo by Charlotte Ekker Wiggins)

King Alfred daffodils are the largest daffodils currently on the market. (Photo by Charlotte Ekker Wiggins)

If you don’t have daffodils in your garden, or you want to plant more this fall to have enough to cut, King Alfred daffodils are the largest available on the market. Just a few make quite a statement and are hard to miss either in the garden or in a vase.

If you want something smaller, look for Tete-A-Tete daffodils, which qualify as miniatures and are long lived once cut and used in flower vases as well.

In between, there are a variety of early, mid and late blooming daffodils and jonquils, providing a nice variety of flowers to enjoy over the next few months. Happy spring!

Charlotte

Fighting Japanese Beetles

Japanese beetles making a meal out of a Rose of Sharon flower in my garden. (Photo by Charlotte Ekker Wiggins)

Japanese beetles making a meal out of a Rose of Sharon flower in my garden. (Photo by Charlotte Ekker Wiggins)

Fighting Japanese Beetles

I was meandering through my garden at sunset when I spotted the beautiful iridescent green spots on a milkweed. Juvenile Japanese beetles, starting to hatch from last year’s buried grubs. For the next 6 weeks, it will be a battle between these wily bugs and I.

The 3/8th of an inch hard shell beetles are eating machines, devouring more than 200 plant species. Once they turn from grubs into beetles, they set off a scent that says "let's party" to other Japanese beetles, yet another reason why you shouldn’t crush the bugs, no matter how tempting.

If you don't see them, you'll know you have them when your plant leaves turn into lace.

Leaves turned to lace is a sure sign of Japanese beetles. (Photo by Charlotte Ekker Wiggins)

Leaves turned to lace is a sure sign of Japanese beetles. (Photo by Charlotte Ekker Wiggins)

Prior to the beetle's accidental introduction into the United States, the Japanese beetle was found only on the islands of Japan, isolated by water and kept in check by its natural enemies. The beetles entered the country as grubs in soil on Japanese iris roots. By 1920, eradication programs were dropped; the beetle proved to be too prolific a breeder.

One of the popular options to eliminate these voracious bugs is Japanese beetle traps, which I don’t recommend. Those are basically pheromone-laced paper bags that attract Japanese beetles. The challenge is the bags don’t catch all of them so having more Japanese beetles in your garden means more potential grubs to hatch out next year.

If you insist on using Japanese beetle traps, make sure you place them at the edge of your property and down wind.

What has worked very well for me over the years is dropping them in a can of soapy water early morning, while they are still sluggish. I pop the soapy water-filled coffee can underneath the plant branches, then shake them. The bugs fall into the water without my touching them.

Soapy water in an old coffee can quickly dispatches Japanese beetles. (Photo by Charlotte Ekker Wiggins)

Soapy water in an old coffee can quickly dispatches Japanese beetles. (Photo by Charlotte Ekker Wiggins)

According to University of Missouri Extension Service, Pyrethrins and Spinosad are effective and non-toxic sprays to try to manage Japanese beetles.

For a long term solution, my brother in Virginia has treated his lawn with milky spores. He has dozens of crepe myrtles, one of Japanese beetles favorite munchies. According to him, Japanese beetle grubs eat the spores; get sick; die and, in the process, release more milky spores. It can take several years to eliminate the Japanese beetles, not counting whether your

Neighbors have treated their lawns.

Believe it or not, there are plants Japanese beetles avoid. The typical kind of plant that will help to drive away Japanese beetles will be strong smelling and may taste badly to the insect. Some plants that deter Japanese beetles include many herbs such as garlic, rue, tansy, catnip and chives. Other Japanese beetle deterrent plants include white chrysanthemums, leeks, onions, marigolds, white geraniums and larkspur.

There are also plants that Japanese beetles skip or only munch on towards the end of their season. I assume these are just not tasty plants: begonias, caladiums, common lilacs, common pear, tulip tree, flowering dogwood, forsythia, hydrangea, hickory, magnolia, persimmon and most oak trees.

Ok, time to soap up and start picking off those pesky bugs!

Charlotte

The Beauty of Iris

Several friends have posted that this color iris was also their Mom's favorite. (Photo by Charlotte Ekker Wiggins)

Several friends have posted that this color iris was also their Mom's favorite. (Photo by Charlotte Ekker Wiggins)

The Beauty of Iris

I blame Mom for my fascination with Iris. These blue iris were her favorite, a North American version of the orchids that grew wild in our backyard trees in Brazil.

When we lived in southern Illinois in an old farm house, she had several beds of iris off to the side of our driveway. It was our job as kids to keep those beds weeded, something that was hit and miss some years depending on what other activities took up our after school time.

I loved weeding those Iris beds. There was something cathartic about pulling out plants that didn't belong and standing back to see my work. In those days I didn't know what the unwelcome plants were, I just knew Mom would not be happy until all of the funny green tufts of green growth were out of her precious Irises.

It's one of the reasons why I started to carry these Iris throws. The applique fabric iris are lovely against the white cotton back drop and so quickly bring a garden vibe into any room.

When a gardening friend heard about my love of iris, he brought me a few new starts last year. Another gardening friend shared a supply of white ones so now I have more than Mom's iris keeping me company in my garden.

White and yellow iris were added last year courtesy of a couple of friends. (Photo by Charlotte Ekker Wiggins)

White and yellow iris were added last year courtesy of a couple of friends. (Photo by Charlotte Ekker Wiggins)

My peach bearded iris have bloomed in this spot for years. (Photo by Charlotte Ekker Wiggins)

My peach bearded iris have bloomed in this spot for years. (Photo by Charlotte Ekker Wiggins)

This iris was a surprise bloom this year, love the color combination. (Photo by Charlotte Ekker Wiggins)

This iris was a surprise bloom this year, love the color combination. (Photo by Charlotte Ekker Wiggins)

Over the years, as I moved from one house to the next, Mom's irises were dug up and moved with me. I didn't always plant them in the best conditions so it could take a couple of years before I had them in the right light and soil conditions to bloom.

It doesn't take much. They like sun but will bloom in partial shade. They don't want to be wet and need to be planted so the root rhizomes sit on top of the soil while the roots are covered.

One of Mom's irises bloomed this year along my cedar fence. (Photo by Charlotte Ekker Wiggins)

One of Mom's irises bloomed this year along my cedar fence. (Photo by Charlotte Ekker Wiggins)

This spring, Mom's bluish/purple Irises made a lovely showing, giving me the opportunity to mark them so once blooming is over, I can group them back together in one color blocked flower bed.

The best time to move Iris is June through September. The shallow-rooted plants need a little time to settle into their new growing spot. Add a little compost to enrich the soil and mulch after planting.

Mom's irises in another spot blooming along with peonies and columbine. (Photo by Charlotte Ekker Wiggins)

Mom's irises in another spot blooming along with peonies and columbine. (Photo by Charlotte Ekker Wiggins)

Mom's irises bloomed this year, along with my peonies, on Mother's Day. Suppose that's a sign?

I like to think that's my mother, who loved my garden, saying from Heaven she approves.

Charlotte

June Gardening Chores

Blackberries ripen in June around the same time as mulberries. (Photo by Charlotte Ekker Wiggins)

Blackberries ripen in June around the same time as mulberries. (Photo by Charlotte Ekker Wiggins)

June Gardening Chores

It was a record-breaking long spring so why not a record-breaking summer. This year it seems we went straight to summer from winter with no spring in between. Anyone else have any kind of spring?

There’s still time this month to try to catch up on some chores and plant, June traditionally is our wettest month of the year.

1.         Plant a new supply of vegetables every 2 weeks to give yourself a new crop through the season. Early spring crops are done but there is still time for tomatoes, green peppers, green beans, cucumbers, zucchini, squash, pumpkins and annual herbs.

2.       Keep asparagus beds weeded and let the green top ferns grow until they go brown; do not cut.

3.        When mulching, leave 2-4 inches clear from the plant stem and the mulch ring no larger than 5 inches deep. More than that and you are smothering the plant itself.

4.        Leave spring bulb greenery to die off naturally. I gently remove the yellow leaves if they bug me and plant summer perennials to cover them in the meantime.

5.         Japanese beetles show up this month so hand pick and drop in a bucket of water with a few drops of dishwashing soap to drown them. Pick early in the morning when they are sluggish. Also treat your lawn with nematodes and milky spores, both will gradually help eliminate grubs. Add geraniums and tansies to your flower beds, they are natural Japanese beetle repellants.

6.         Trim lilacs immediately after they end flowering so growth the rest of this year will provide blooms next year.

7.         Get flower pots planted. Water the soil first, let drain, then add your flowers for better adjustment.

8.         Plant annual flower seeds such as zinnias, sunflowers, forget-me-nots, cosmos, marigolds and herbs. Some herbs can be moved inside later for winter use.

10.       When planting wildflowers, mark the beds where seeds have been added. Some wildflowers may take 2 years to germinate.

11.       For those of you with grass, don’t cut more than 1/3 of the grass down at one time.  For spots where grass doesn’t grow, plant flowers.

Native flowers such as coneflowers start to bloom this month and continue until fall frost. (Photos by Charlotte Ekker Wiggins)

Native flowers such as coneflowers start to bloom this month and continue until fall frost. (Photos by Charlotte Ekker Wiggins)

12.       When adding perennials, focus on native plants. Once established, they will require less water and care than non-natives and they will be food for native pollinators.

13.        Pinch mums once a week to encourage them to grow bushy for fall flowering. I take the pinched off pieces, gently push them into the ground and encourage more plants to grow.

14.        Feed roses and other plants compost to give them a good source of energy. Roses should be fed once a month. A quick pick me up is to dig your banana peels, egg shells and coffee grounds in around roses.

15.         Take photos of your garden. Use the same photo spots you used in spring so you can see the changes from one season to the next.

16.         Also make sure to have a nice seating area in your garden so you can stop and smell the flowers!

Charlotte


Tomato Trouble

This tomato is definitely in trouble for several reasons! (Photo by Charlotte Ekker Wiggins)

This tomato is definitely in trouble for several reasons! (Photo by Charlotte Ekker Wiggins)

Tomato Trouble

Several readers are having trouble getting tomato seeds started this year and for good reason. Not only has it been record cold but we have jumped from winter to summer with little spring in between.

Tomatoes are very close to my heart. I wrote a speech in high school about tomatoes first name, “love apples.” They are actually fruits re-categorized as vegetables to work around a 19th Century import tax.

There are several factors that can cause trouble with tomatoes, starting with seedlings that die off. The condition is called “damping off” and covers several possible fungi that can kill off seedlings. Start again with brand new potting soil use  a washed or new container. Add crushed egg shells in bottom before adding more soil to ward off blossom end rot, which is caused in the fruit by a calcium deficiency. Keep the pot in a window for warmth and away from drafts. Water with a spray bottle so you don’t over-water.

The second problem is flowers that drop. There are several reasons tomatoes drop their flowers, starting with the impact of record high temperatures. Tomatoes, like most flowering plants, go into survival mode if temperatures are above 90F for five or more days in a row.

Plant survival mode means most systems are shut down, including pollen production. It’s why a plant may seem to die in hot weather and yet reappear the following year. As long as the roots can pull through, most plants will survive.

Tied to temperature is high humidity. Humidity that is too high prevents pollen from sticking to the stigma once it is released. Without pollen, there are no pollinators and without pollinators, there are no flowers that produce tomatoes.

These cherry tomatoes grew over winter inside my house, the last of my winter crop. (Photo by Charlotte Ekker Wiggins)

These cherry tomatoes grew over winter inside my house, the last of my winter crop. (Photo by Charlotte Ekker Wiggins)

In addition to weather conditions, tomatoes need pollinators such as native bumblebees. These little hoodlums of the bee world literally shake the tomato plant, releasing pollen all over the stigma and themselves. When high temperatures shut down pollen production, they also put bees out of business.

As they grow, make sure tomato plants don’t get too much nitrogen fertilizer. A balanced plant meal requires nitrogen for growth, phosphorous for moving energy through the plant, and potassium for stress tolerance.  Our Ozark soil can provide nitrogen but the other two fertilizer elements usually need a boost.

The other delicate part of raising tomatoes is watering. Tomato roots in open ground can grow to 5 feet deep. Tomatoes even grown in containers prefer to be evenly moist so with temperatures, and humidity, either at record levels or varying widely, requires careful monitoring.

Plant herbs with your tomatoes. The herbs will help detract bugs. Basil is the number one herb for tomatoes, but other herbs compliment tomatoes as well: bay, chives, dill, marjoram, oregano, parsley, rosemary, savory, tarragon and thyme. 

I have sunken plastic bottles with holes in pots keeping my tomatoes company so that I can better keep the roots moist. I also use a paint stick propped into the side and moved over an inch to check how wet the soil is before I water.

And that speech about tomatoes I gave in high school?

I got an A. I suspect it would have been an A+ if I had not eaten the display.

Charlotte