Why Amaryllis Not Blooming

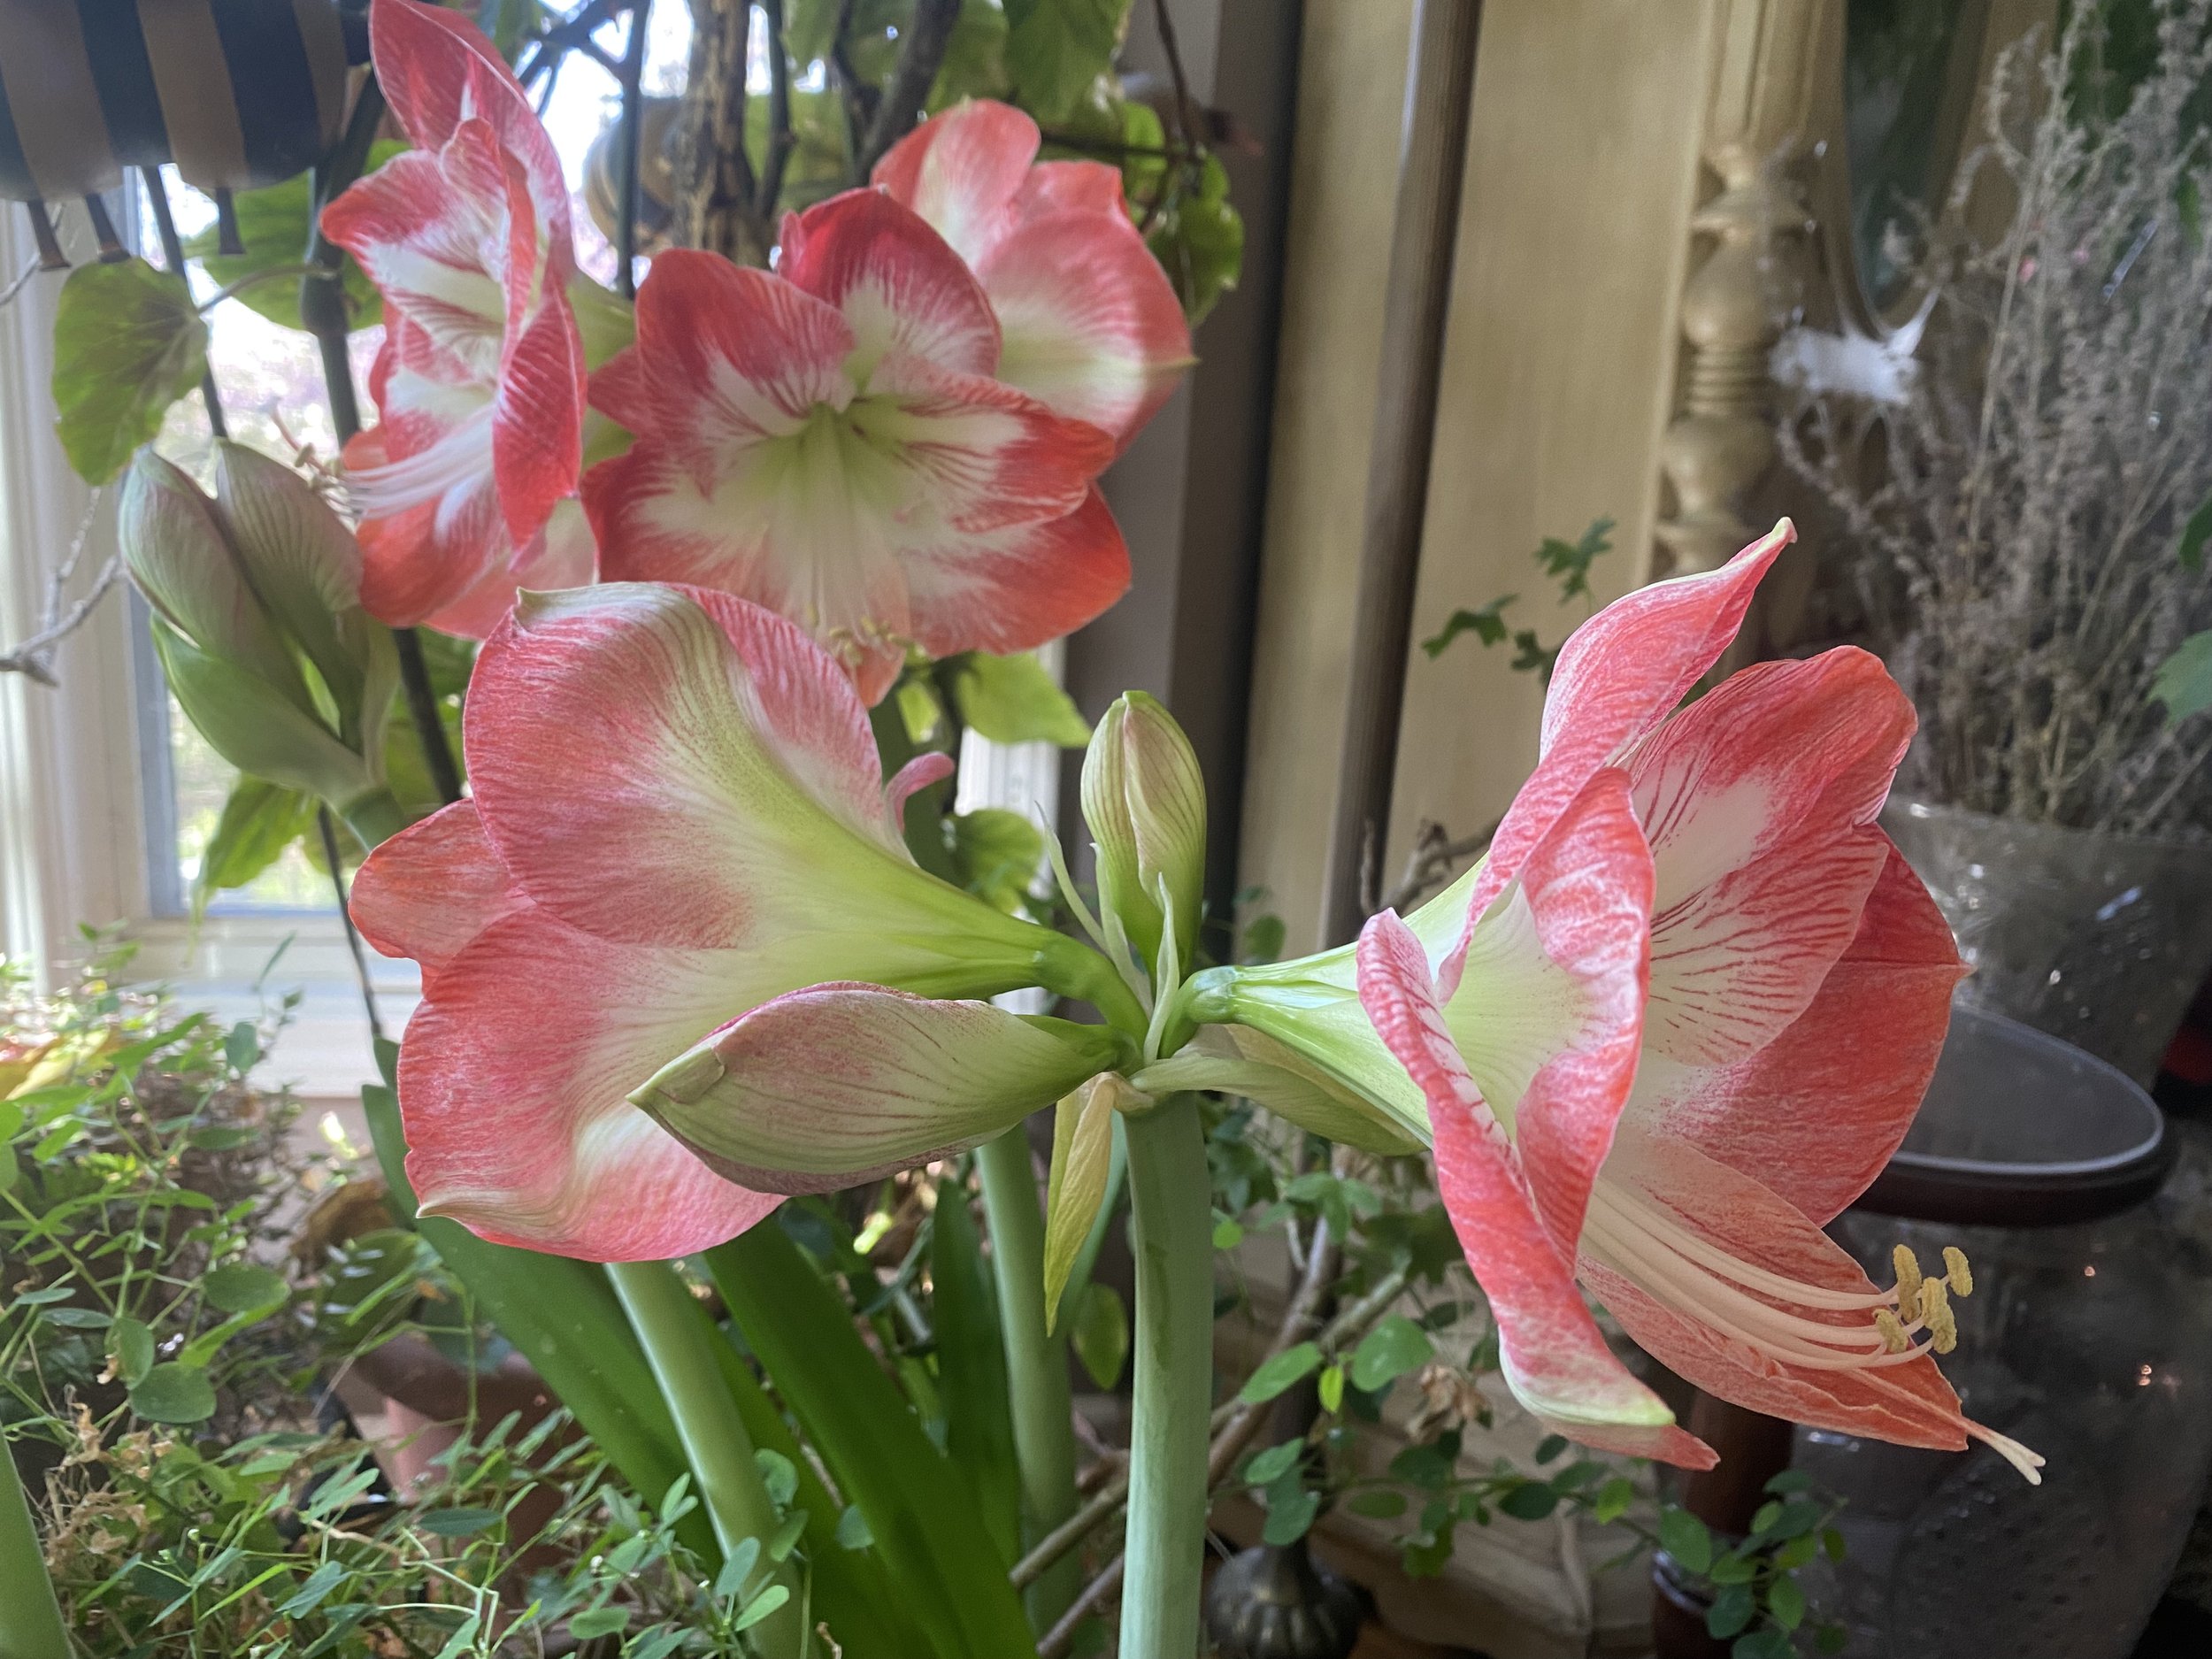
These minerva amaryllis re-bloom for me every winter. (charlotte ekker wiggins photo)

“Amaryllis are so pretty. What's wrong when my Amaryllis just sends up one leaf. The leaf gets tall but no flower.” — Bruce

Why Amaryllis Not Blooming

Hi Bruce, your Amaryllis bulbs haven’t saved enough energy from the sun to bloom so all they can do is grow leaves as solar collectors.

The good news is that if you let the leaves grow and gradually die off, your bulbs should be able to bloom in their next growing cycle.

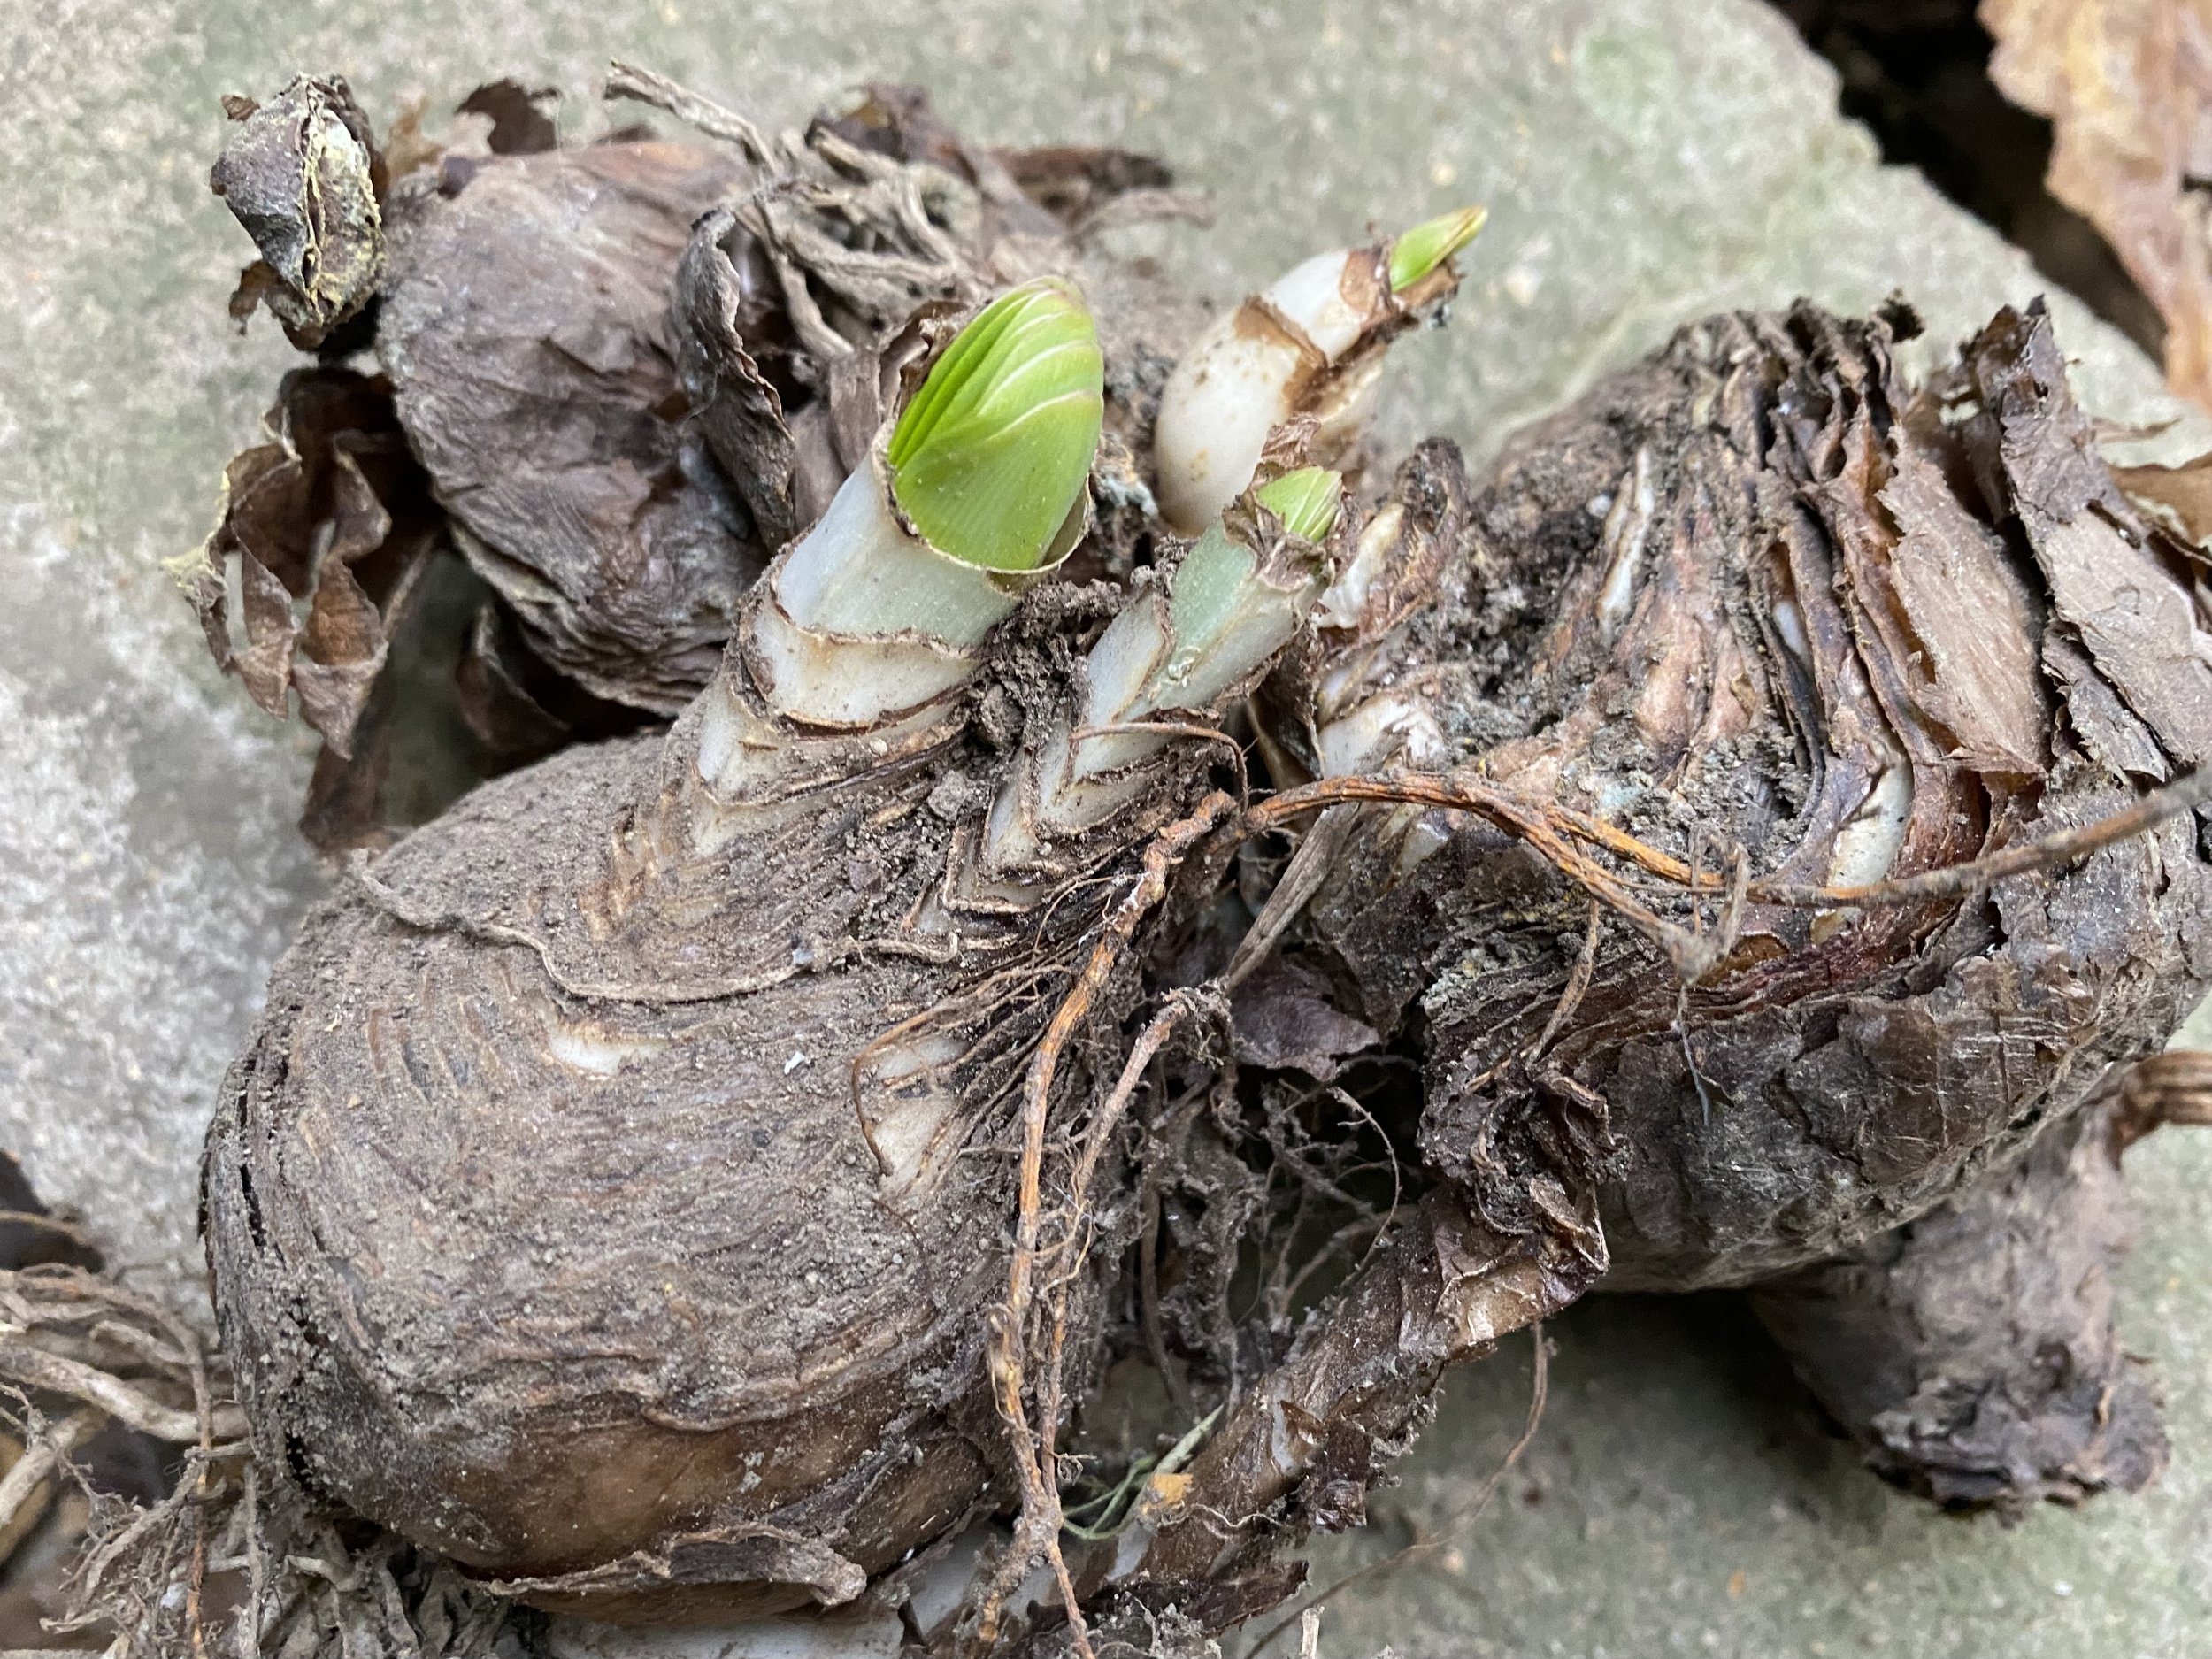
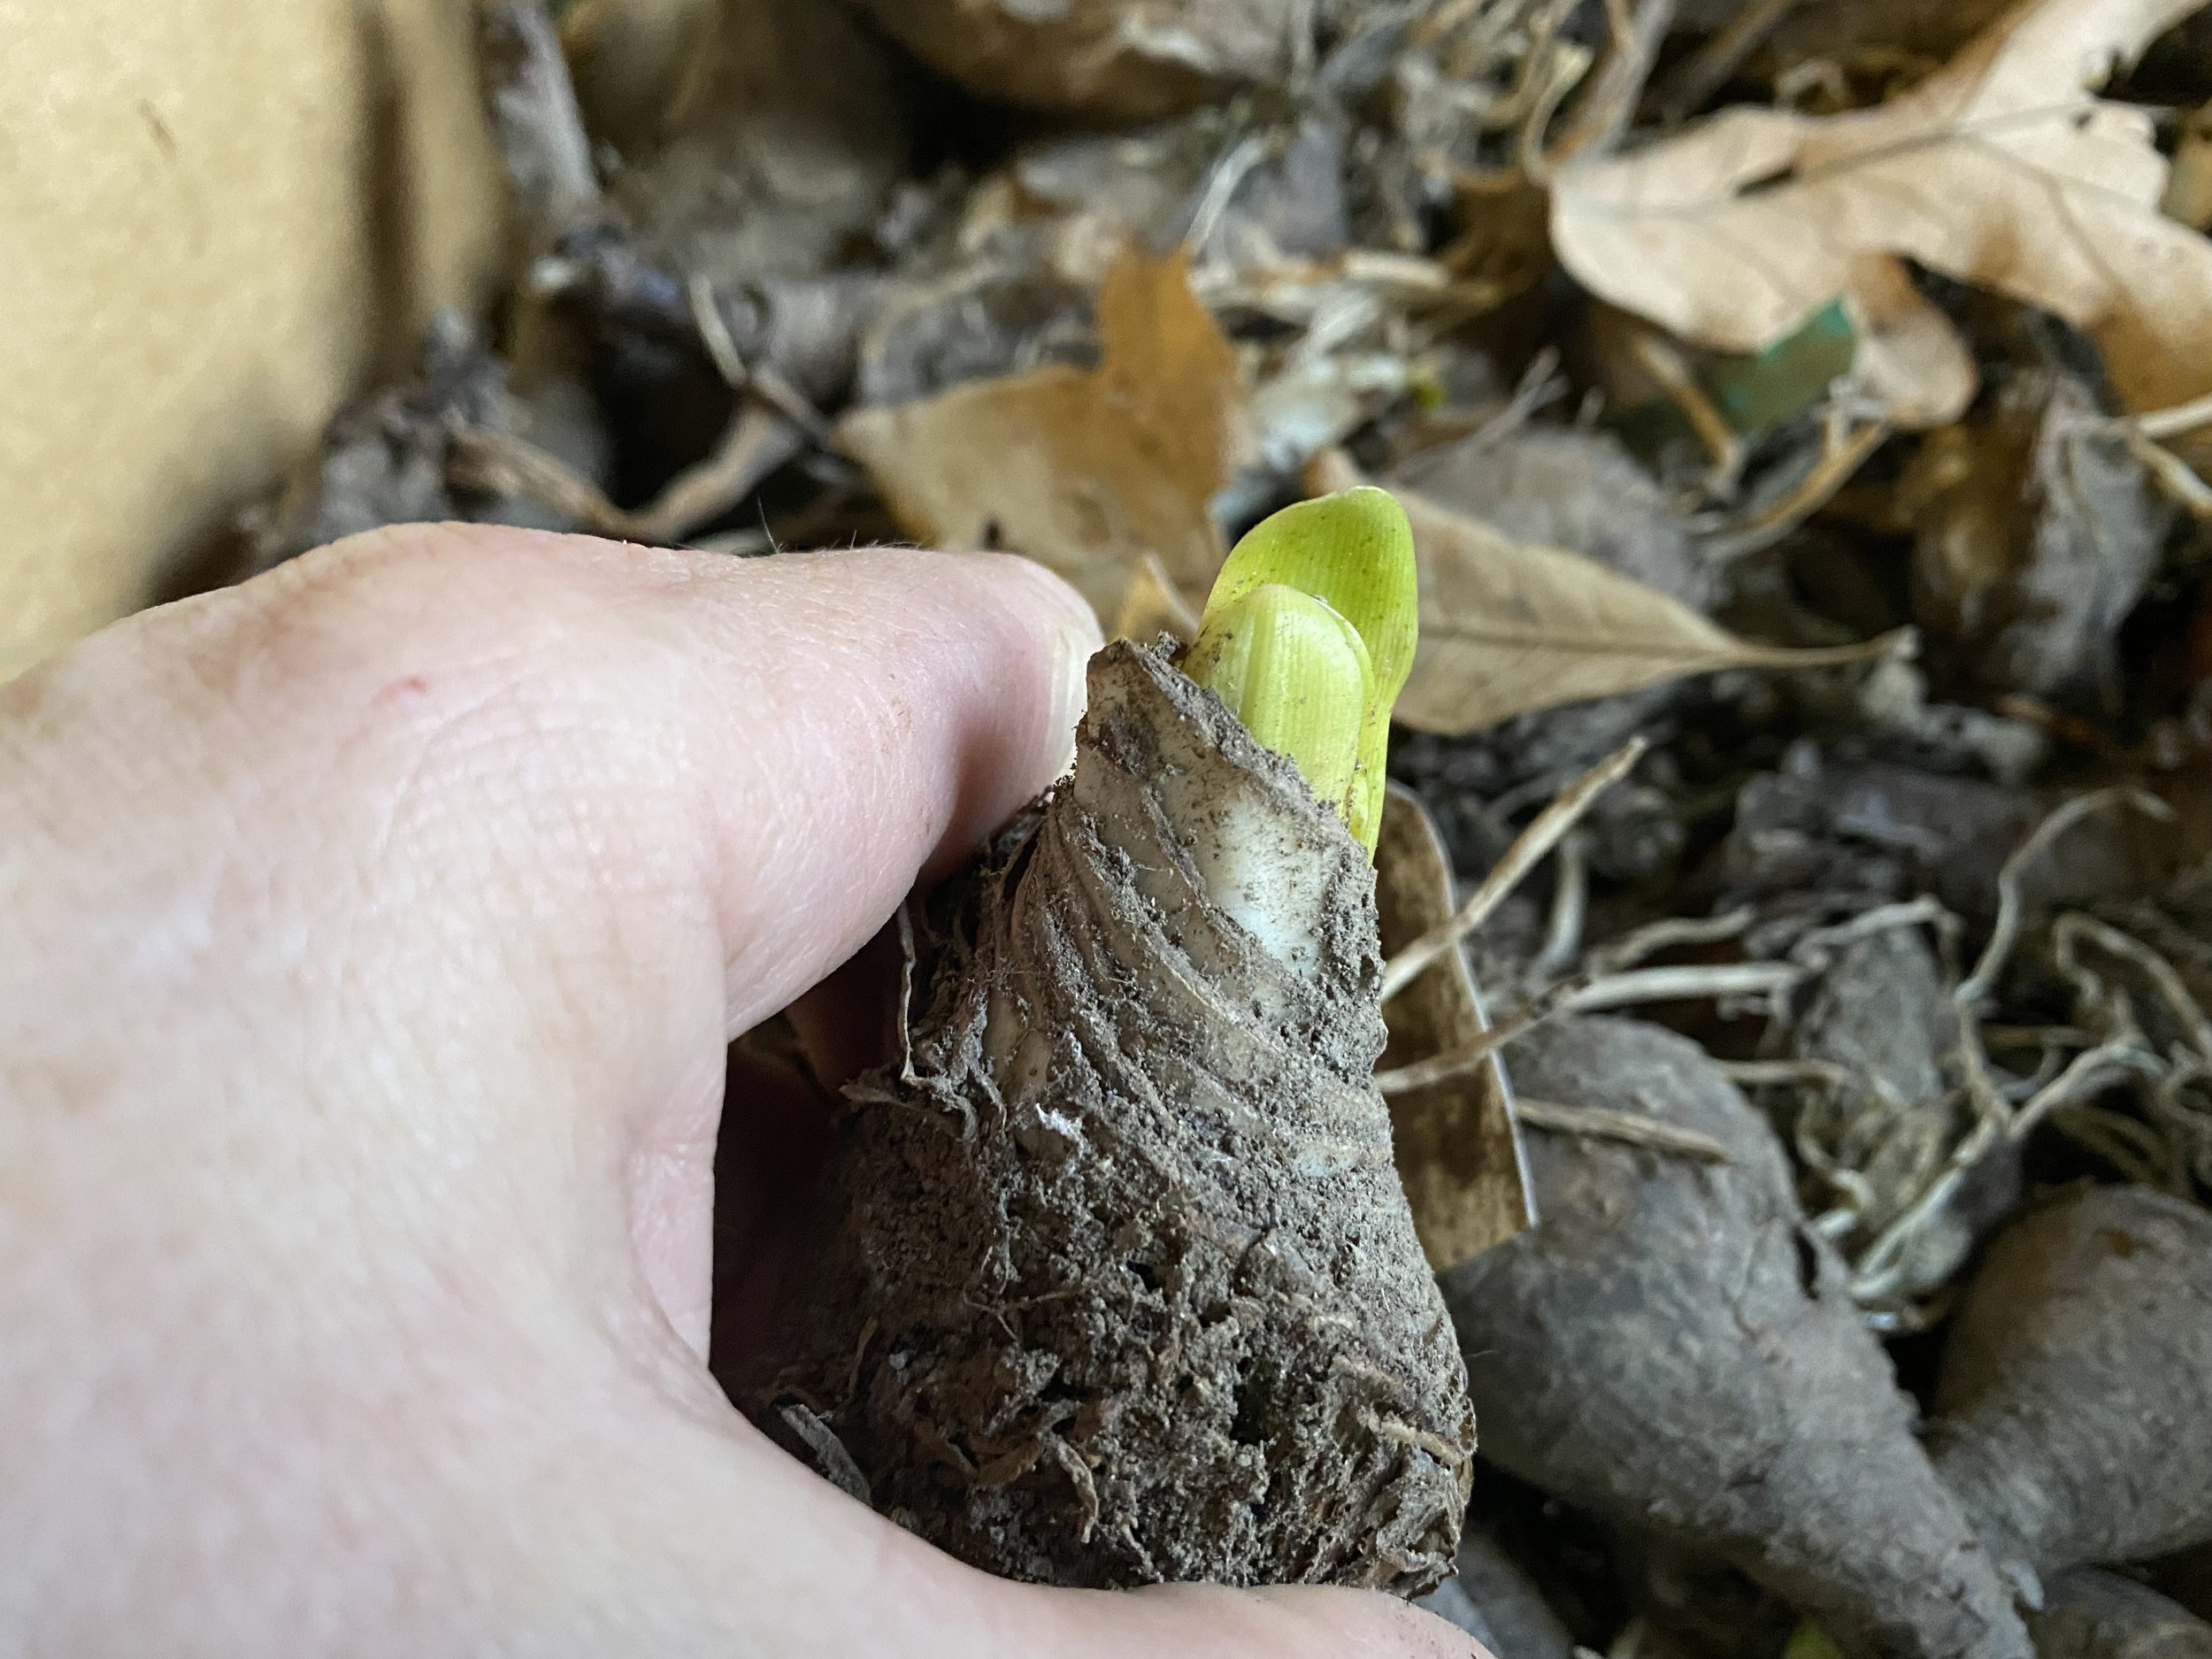
bulbs with blooms have buds growing from bulb top. (charlotte ekker wiggins photo)

After letting your bulbs rest for a couple of months without watering, replant them in new soil and watch the bulb tops. If they have enough stored energy a bud will start growing. If not, you will have more leaves to help collect sun.

Be patient, they are well worth the wait!

Charlotte

Peonies Not Blooming

Herbaceous pink peonies and a hybrid Itoh yellow peony from my garden. (Charlotte Ekker Wiggins photo)

“Charlotte you have the most beautiful peonies, how do you get them to bloom? I have several plants that have never bloomed. What am I doing wrong? “ — Sarah

Peonies Not Blooming

Hi Sarah, how deep do you have the roots planted? Peony roots need to be only about 2 inches below soil level. If they are planted any deeper they don’t bloom.

Peonies also prefer sun to shade so make sure they are getting 6-8 hours of sun a day.

Peonies also appreciate more acidic soil and some compost every year. I tend to add it after they bloom so they have all season to absorb the nutrients.

Even established peonies need regular moisture. If the soil is getting too dry, make sure they are regularly watered. I add mulch to help them stay hydrated.

Hope these tips help you get peony blooms next year!

Charlotte

Painted Cattle Panels

“Charlotte, I am hoping you can tell me how your black painted cattle panels held up and which brand of black paint you used? Are you in an area of snow and rain? “— Andrea

Painted Cattle Panels

Hi Andrea,

My handyman said I didn't need to spray the cattle panels but they may develop rust like mine did.

I have painted them both gray and black. Both paints I used on the cattle panels held up quite nicely (photo attached)

They were both satin paints, the standard Rustoleum spray paint and primer.

The last photo is of the '“grey” arbor. Either grey or black will work especially if you will have it covered with climbing plants most of the season.

I live in USDA Hardiness zone 5b with snow and ice off and on during winter and lots of rain spring, sometimes fall.

Charlotte

Are Mums Still Alive?

This is a wintered-over mum getting new spring growth. (Charlotte Ekker Wiggins photo)


”Charlotte, I took your advice and planted some mums from my neighbors. They look dead now. How can I tell if they are still alive?” — Noreen

Are Mums Still Alive?

Hi Noreen. Once the mums are planted, make sure to add a little leaf mulch around the base to keep new growth protected.

You won’t see much through winter but keep them moist, at least one gallon per plant per month.

I tend to peek into the centers late winter hoping to see some early sign of green growth. Even a tiny start will flush out into a new plant with the growing season.

This sliver of a mum will grow into a new mum plant. (Charlotte Ekker Wiggins)

Also don’t cut off the dead flowers and stems, those will protect the new growth through winter and early spring. I depend on those old tops to guide me to where a new mum should be growing.

Use dead mum stems to guide you to find new growth. (Charlotte Ekker Wiggins photo)

Once you see new growth, keep them watered until they’re about 4-5 inches high. Then pinch off the top growth every week or so until July 4 to keep the plant bushy.

I take those cuttings and gently plant them in nearby soil to start new plants.
Charlotte

Are All Fall Bulbs Good

“Charlotte I see spring-flowering bulbs on sale this time of year, are all fall bulbs good to plant?” - Samantha

Are All Fall Bulbs Good?

Green growth is a sure sign this surprise lily bulb is still alive. (Photo by Charlotte Ekker Wiggins)

Hi Samantha, not necessarily. Some bulbs may look dead when they are just dormant; others may have dried up and will never bloom again.

First check that the bulb feels firm. Mushy, empty bulbs are dead and won’t grow again. You can gently feel most bulbs through the packaging.

Secondly, check the tips. Bulbs that are still healthy and ready to grow may have a little green tip showing at the bulb top. You may also see tiny roots springing from the bottom of the bulb.

Finally check the season they are supposed to grow. Some bulbs are annuals and only grown one season.

If you see any of these signs of life, definitely pick them up and get them in the ground as soon as you can. many spring-blooming bulbs need exposure to cold for at least 8 weeks before they will bloom such as tulips and daffodils.

If you can’t plant them, consider potting them and storing in a refrigerator for the 8 or 12 weeks they need. Then you can pull the pots out and let the bulbs grow in the pots. Once they are done, you can move the bulbs back into your garden.

Charlotte

How To Get Mums Blooming

This recently-planted mum is still showing signs of flowers. (Photo by Charlotte Ekker Wiggins)

“Charlotte, Even planted mums never seem to bloom again for me. Do yours really do so? What’s your secret?!” - Lucy

How to Get Mums Blooming

Hi Lucy,

Left unmanaged, chrysanthemums will grow long and leggy with few blooms. To get them to have more flowers, start pinching them back 1-2 inches every week or so during the growing season until July. The pinching will encourage the plant to grow bushy and encourage blooms throughout the cut back plant.

Don’t throw out those trimmings, either. I just gently stick them in the nearby ground and make sure they are watered. They will usually grow a new plant although it may not bloom until the second year.

Charlotte

Serving Wildlife Pumpkins

Squirrels have nicely, and thoroughly, cleaned out pumpkin seeds. (Photo by Charlotte Ekker Wiggins)

“Hey Charlotte, you’ve inspired me not to trash my pumpkins and to feed them to the resident wildlife. Do I need to cut the tops off, remove seeds, bake it? Just kidding, I have pumpkins left over from Halloween. Now what? — Esther

Serving Wildlife Pumpkins

Hi Esther,

Glad you are not tossing out your pumpkins and instead are making good use of them. Your wildlife will appreciate having the food going into winter.

First, you don’t have to do anything to the pumpkins themselves. Squirrels will find them and make quick work of cutting into, removing, and storing the pumpkin seeds.

Your job is to find a spot behind your property where wildlife can easily and safely access the pumpkins without being a bother to your neighbors.

I don’t have neighbors on three sides so I pile my pumpkins at the back of my property near a winter feeding station. I keep a salt block there as well as a bird feeder I fill with cracked corn for deer and wild turkey. Squirrels can help themselves, too; this is basically a cracked corn dispenser. Water is nearby in a pond.

I pile my pumpkins near the winter feeding station, a bird feeder I fill with cracked corn for deer and wild turkeys. The window frame in the back will be a cold frame for winter planting. (Photo by Charlotte Ekker Wiggins)

Although I see a variety of wildlife in my garden through the year, I try not to feed them until winter, when food is scarce. I also try to keep the food away from other possible edible candidates. This sweet Woodland Friends Throw captures Santa feeding wildlife. I used one of these throws for an office Christmas scene when I used to work for the Forest Service.

Finally consider how safe a wild animal would be where you plan to place the food. You want to give them some protective cover without enticing them into an area where they may get caught.

And oh, make sure you don’t mind having pumpkins growing there next year. It hasn’t happened in my spot yet but I’m planning to plant pumpkin seeds there next year.

Now pull out those binoculars and have fun keeping an eye on your feeding area, you may be surprised at what you will see!

Charlotte

Where to Store Amaryllis

This Amaryllis is going dormant as its leaves turn yellow. (Photo by Charlotte Ekker Wiggins)

“I live in an apartment. Where can I put an amaryllis plant to go dormant. If I put it in my crisper do I have to put the bulb in a bag.” — Donna

Where to Store Amaryllis

Hi Donna, do NOT put your Amaryllis bulb in your refrigerator crisper, this is a tropical plant and the cold will kill it.

Keep the Amaryllis bulb watered in a pot in a window until all of the green leaves turn yellow and die off. If you don’t have a window, keep it as close to sunlight as you can so the leaves can collect sun and store it in the bulb. Let it go dormant on its own time.

These Amaryllis bulbs are ready for a nap for a few weeks. (Photo by Charlotte Ekker Wiggins)

You can place the Amaryllis bulb in a brown bag after all of the greenery has died back.

Leave it in a closet or in a cabinet at room temperature.

Let it rest for 6-8 weeks, then repot it. I sometimes just leave it in the original pot and start watering it when I want it to regrow.

This Amaryllis is starting to regrow, see the bud on the left? (Photo by Charlotte Ekker Wiggi

If the Amaryllis bulb has collected enough sunlight through its leaves, you will enjoy another blooming cycle.

Here’s one of my re-blooming Amaryllis, love to watch them re-grow! (Photo by Charlotte Ekker Wiggins

Amaryllis bulbs are easy to care for so you can get them to re-bloom and well worth the effort, I have some Amaryllis bulbs that are more than 10 years old.

Charlotte

How to Save Zinnia Seeds

Zinnia seeds are found at the end of flower petals protected in the plant seed head. (Photo by Charlotte Ekker Wiggins)

Zinnia seeds are found at the end of flower petals protected in the plant seed head. (Photo by Charlotte Ekker Wiggins)

“I've had a good crop of zinnias this year and trying to save and collect the seed. Problem is it's hard to see the seed! So basically I've just broken them up removed the stem/waste parts and figure whatever is seed will find it's why in the ground. I have been collecting Rudbeckia seed heads and it's really hard to find the seed there......any secrets to saving seed? Also is it best to plant in fall or spring? Thanks!” — Diana

How to Save Zinnia Seeds

Hi Diana, every plant saves its seeds a little differently. Zinnias have their seeds at the end of their petals saved individually in the flower head.

I am saving zinnias myself and took this one apart to show you what the seeds look like. When the seed head is all dry, the plant drops its seeds so when planting, you need those grayish black-looking flower pieces, those are the seeds.

I will spend an evening over winter separating the dried seeds from the flower heads to make sure I am planting seeds.

For both plants you plant the seeds in spring after the last hard frost which in USDA Hardiness zone 5 is Mother's Day.

Do a search for the plants you are saving and you will find photos of what the seeds look like.

Now some plants need exposure to cold weather such as purple coneflowers so again, check on the specific needs of the plants you are planting, they are not all the same.

Charlotte

Rose of Sharon Trees

Rose of Sharon, left, and Panicle Hydrangea, right, trimmed as trees. (Photo by Charlotte Ekker Wiggins)

Rose of Sharon, left, and Panicle Hydrangea, right, trimmed as trees. (Photo by Charlotte Ekker Wiggins)

“Charlotte I love your Rose of Sharon trees, where did you get them? I would like to add some to my garden….” - Lila

Rose of Sharon Trees

Hi Lila,

If you have Rose of Sharon shrubs or access to them, that’s all you need. The Rose of Sharon trees in my garden are shrubs I pruned into a tree shape. The hardest part of doing it is/was waiting!

Rose of Sharon are a cousin to tropical hibiscus. A hardy perennial usually grown as a shrub, these hibiscus are helpful to have in the garden because they bloom mid to late in the summer season when little else is in bloom.

Keeping a Rose of Sharon shaped as a tree takes persistence and patience. (Photo by Charlotte Ekker Wiggins)

Keeping a Rose of Sharon shaped as a tree takes persistence and patience. (Photo by Charlotte Ekker Wiggins)

The Rose of Sharon trees in my garden are lavender, pink and white. Several are double lavenders and I have a blue chiffon on my wish list for a new garden area. Until then, I check my trimmed Rose of Sharon trees to make sure they are not putting energy into sprouting side shoots.

Remove any growth along the stem to encourage a straight trunk. (Photo by Charlotte Ekker Wiggins)

Remove any growth along the stem to encourage a straight trunk. (Photo by Charlotte Ekker Wiggins)

If I see those side shoots, I cut them off right then and there, no guarantee I will remember to trim later during winter or early spring.

Young Rose of Sharon trees may need support for a couple of years as their stems get thicker. I use rebar pieces in various lengths to give them support. The rebar can then be re-used for other garden projects like training Eastern Redbuds to grow straight.

Rebar makes good support and can easily be reused. I will tie this gently to the trunk.(Photo by Charlotte Ekker Wiggins)

Rebar makes good support and can easily be reused. I will tie this gently to the trunk.(Photo by Charlotte Ekker Wiggins)

The other consideration is where to place the Rose of Sharon trees in your garden so they become a focal point.

If for some reason you don’t like where you’ve settled them, they can easily be moved in their first few years. They may not bloom for a year after the move but it’s better to have them in the right spot than growing where you can’t enjoy them.

Another Rose of Sharon tree that is about 5 years old. (Photo by Charlotte Ekker Wiggins)

Another Rose of Sharon tree that is about 5 years old. (Photo by Charlotte Ekker Wiggins)

As I said, the most challenging part of growing Rose of Sharon trees is being patient. It can take 5-7 years before a Rose of Sharon tree trunk is strong enough to hold up the tree and bloom.

Staking the trunks and removing any side growth can help speed up the process but it’s not a quick process.

I happen to think it’s worth it because it provides our gardens with an interesting shape that helps us enjoy the mid-summer blooms.

And bumblebees love these flowers, too!

Charlotte

Soak Hard Seeds

IMG_2998.jpeg

“Charlotte I want to plant some of my mother’s morning glories but they are not sprouting. Any ideas why?” — Paul

Soak Hard Seeds

Hi Paul, how lucky that you have morning glory seeds from your mother’s garden. I myself cherish the blue irises I have from my mother’s house.

Morning glory seeds have a hard outer coat. To help them germinate, soak them in water for a day or overnight, then make sure to plant in moist soil, then water again once planted. If you are deft with a knife, you can also knick a little piece of the hard seed coating and then overnight in water.

Other seeds that benefit from soaking include nasturtiums and hyacinth beans.

Once you soak them, you will notice that the outside has some give when you gently press the seed. That should make germination easier.

Charlotte

Blooming Peonies

One of the peonies that wasn’t blooming - but now does. (Photo by Charlotte Ekker Wiggins)

One of the peonies that wasn’t blooming - but now does. (Photo by Charlotte Ekker Wiggins)

“Charlotte your peonies are lovely. I have some from my mother’s garden but none have bloomed, how long does it take? Any other suggestions to get them to bloom?” - Madison

Blooming Peonies

Hi Madison,

How wonderful that you have peonies from your mother’s garden.

The biggest challenge with getting peonies to bloom is how deep you planted them. If you look at the roots, the growth comes from dark pink growth nodes, or eyes. Those should be planted no deeper than 2 inches below the top soil level. The eyes should also be pointed up.

If your peonies are planted deeper, you can dig them up either in fall or early spring and reposition the root to the 2-inch depth.

Peonies also spend their first few years growing roots, then leaves. I don’t know how long your peonies have been with you but depending on your soil type they can also take a number of years before they have enough energy to develop flowers.

To give your peonies a little help, fertilize them in early spring with a product that’s low in nitrogen so the plants spend time growing flowers. Look for fertilizers with 10-20-20, you want the phosporous and potassium levels to be higher to encourage blooms.

If you have to move them, give them a little space so prevent developing diseases. Hope this helps!

Charlotte

Planting Tomato Seeds

Tomato seedlings started in February in pot of soil in a southern exposure window. (Photo by Charlotte Ekker Wiggins)

Tomato seedlings started in February in pot of soil in a southern exposure window. (Photo by Charlotte Ekker Wiggins)

“…I’m going to start gardening this year planting tomato seeds. How hard are tomatoes to grow?” — Nancy

Planting Tomato Seeds

Oh, my, Nancy, SO easy you should get started as soon as you’re ready.

Actually I get started even if I’m not ready. If I have a pot of soil, I will get a start on tomatoes. The ones in the photo were from a cherry-size tomato that grew inside through winter. Since I liked the plant size I popped it into the soil and kept it watered. Within days, new starts were coming up.

The ones in the top pot were about 3 weeks old. They have been growing in a southern exposure window.

Almost six weeks later and those tomato seedlings are ready to move. (Photo by Charlotte Ekker Wiggins)

Almost six weeks later and those tomato seedlings are ready to move. (Photo by Charlotte Ekker Wiggins)

Now maybe 6 weeks later, they are nicely established and need to move to individual planting containers. I made some out of toilet paper rolls.

And just to show you how easy this is, I started another little glob of tomato seedlings.

Tiny tomato seedlings will provide a second crop of tomato plants. (Photo by Charlotte Ekker Wiggins)

Tiny tomato seedlings will provide a second crop of tomato plants. (Photo by Charlotte Ekker Wiggins)

The tiny starts in that one spot were from a tomato I snuck under the soil. I should now separate them so they will have more room to grow.

Once temperatures are steadily over 60F, I will take them outside for a few hours to get them used to the outdoors. After may 10, our last hard frost date, they should be ready to grow in pots on my deck and in my garden.

Easy enough?

Charlotte

Garden Mum Winter Pruning

At the end of the growing season, mums fade and turn brown but there is still life. (Photo by Charlotte Ekker Wiggins)

At the end of the growing season, mums fade and turn brown but there is still life. (Photo by Charlotte Ekker Wiggins)

“Charlotte, Do you prune your garden mums back in the fall or do you keep the dead tops on them all winter ?” - Lou

Garden Mum Winter Pruning

Hi Lou, I leave the dry tops on all winter to protect the new growth. Here are some examples.

This first chrysanthemum - mums for short - looks dead, doesn’t it. But the appearance of the top growth can be misleading.

Dried mum greenery helps to protect new growth below. (Photo by Charlotte Ekker Wiggins)

Dried mum greenery helps to protect new growth below. (Photo by Charlotte Ekker Wiggins)

If you gently move the dead outside growth aside, you should see new growth developing at the bottom of the plant stems.

Mums can grow tall and leggy if not pinched back as they grow. Growers produce the rounded mounds we associate with these bug-repelling plants by pinching them during their growing season.

If left to their own growth rate, they can grow quite tall and fall over from the weight of their flowers.

I have a pair of thread snips I dedicate to keeping my mums pinched back. The thread snips make the process relatively easy, if I can remember to do it on a regular schedule.

If you move the dried tops apart, you can see the new growth. (Photo by Charlotte Ekker Wiggins)

If you move the dried tops apart, you can see the new growth. (Photo by Charlotte Ekker Wiggins)

Here’s another example. This chrysanthemum is just starting to die back. Spent flowers are turning brown but some of the pinched back stems are still showing green.

If this were spring, you could cut some of those green branches and insert them into soil to start new plants.

The greenery in this mum example is easier to believe it’s still alive.

A fading mum loosing its blooms with stems that are still green. (Photo by Charlotte Ekker Wiggins)

A fading mum loosing its blooms with stems that are still green. (Photo by Charlotte Ekker Wiggins)

If you have a mum that is dying still in a pot, gently remove it from the pot. If the plant is still alive, you may see growth around the top and outer edges of the root ball.

You will find the new growth in the same spot as the mum that looked dead, in the center bottom.

The new growth is found at the base of the branches. (Photo by Charlotte Ekker Wiggins)

The new growth is found at the base of the branches. (Photo by Charlotte Ekker Wiggins)

The new growth needs a little pampering during its first winter. If there isn’t precipitation, it’s a good idea to take a gallon of water out once a month or so and watering the mums. That new growth can use the moisture to keep the tiny roots alive through cold weather.

I also don’t remove the spent blooms or dead branches. Those help protect the new growth until spring, when the mum can then continue to grow and returns every year for years to come.

This honey-colored mum is probably my all time favorite mum color. I’ve had these mums in my retaining all garden beds for 3 years now, planted along the corners of the flower beds so they can be enjoyed as I walk up and down the steps.

The first year I added them I made sure to water them through winter to make sure they got established. Now that they are settled in, I try to remember to pinch them back in spring from May-July to keep their growth short.

As you can see, I didn’t do a very good job with this bunch. Frankly I wasn’t too upset with myself, the longer stems make for better cut flowers.

Lambs ears, left, keep my honey-colored mums company in the fall. (Photo by Charlotte Ekker Wiggins0

Lambs ears, left, keep my honey-colored mums company in the fall. (Photo by Charlotte Ekker Wiggins0

Mums are a wonderfully, long-lived cut flower. If you get bouquets from florists, you will note that they often use mums in the bouquet because they last so long.

Mums are also excellent additions to your garden and not just for the pop of color. Mums are a natural bug deterrent so they can help keep your garden bug free without the use of pesticides.

Back to the cut flower use, though. Who wouldn’t want to have long lasting flowers??

Charlotte

Moving Tomato Plant Inside

A cherry tree I now have growing in a sunny den window. (Photo by Charlotte Ekker Wiggins)

A cherry tree I now have growing in a sunny den window. (Photo by Charlotte Ekker Wiggins)

“Charlotte, don’t laugh. I am very attached to a tomato plant my mother gave me last spring. It’s still going strong. Can i bring it inside. Do you think it will live?” - Melissa

Moving Tomato Plant inside

Not only will it live, Melissa, but I will chuckle with you. If you have the correct light and keep it evenly watered, it may still be giving you tomatoes next year.

In their home grounds of Peru in South America, tomatoes grow as perennials. The only reason we treat them as annuals is our temperatures in USDA zone 5 (for us) and, in general, for most of north America, it gets too cold for these tropical plants.

If we bring them inside, though, they can flourish. I have pulled tomatoes through for several years - one plant was with me continually for four years.

This year I started a cherry plant very late in the season. It’s an indeterminate tomato, which means it will keep blooming as long as it has the right nutrients and growing conditions. As opposed to determinate tomatoes, which provide a limited tomato supply and then stop producing fruit.

When temperatures started to drop, this plant kept growing. It was doing so well that I moved it into my garage until I could find a south-facing window for it.

This cherry tomato is still blooming so more tomatoes are on their way. (Photo by Charlotte Ekker Wiggins)

This cherry tomato is still blooming so more tomatoes are on their way. (Photo by Charlotte Ekker Wiggins)

Tomatoes are pollinated by bumble bees. You can also artificially pollinate by using a small paint brush and moving pollen from one flower to the next. I’ve done that when the inside tomato plant was blooming in January and no bumblebees were around.

From the look of this cherry tomato plant, there should be many more tomatoes before I need to do that.

Once you have it inside, monitor the soil. Tomatoes like soil moisture level to stay even. Winter conditions in our homes can be dry so I daily check to make sure the soil is not drying out.

Now this cherry tree is a new one for me. Yes, it’s a cherry plant. I have been tying it up as it grew and it now this cherry plant is a good 7 feet tall. Don’t you think this qualifies now as a tree?

The 7-foot cherry tomato now wintering over in my den. (Photo by Charlotte Ekker Wiggins)

The 7-foot cherry tomato now wintering over in my den. (Photo by Charlotte Ekker Wiggins)

Tying up the tomato plant makes it easier to keep sucker branches removed. It also makes it easier to find ripe tomatoes.

I am also seriously considering adding Christmas lights. Wouldn’t this make a nice Christmas tree?

Charlotte

Elevated Pot Gardens

This is an example of a pot garden that has been elevated. (Photo by Charlotte Ekker Wiggins)

This is an example of a pot garden that has been elevated. (Photo by Charlotte Ekker Wiggins)

….I loved the idea of a pot garden but want something ai can easily reach. I’ve seen raised beds but not ones with pots, is that even possible?” — Amanda

Elevated Pot Gardens

Hi Amanda, it’s easy to raise your pot garden like one would a raised bed. Measure the right height for you and then take a look at the size of the pots you plan to plant in.

You can either build, or have built, basically wood trays on legs that will hold your pots to the height you need. Or you can buy pre-made raised beds and just use pots in the beds instead of adding soil.

I personally like to have elevated working surfaces when I garden or putter. I have a gardening table my handyman helped me to make where i can stand and fill pots or do whatever I need to get done.

The important measurement here is what height will work for you. Some pre-made raised beds can be too high so before loading them up with pots, measure the raised beds and have the legs adjusted accordingly.

The elevated pot garden in the photo was at one of our local apartment buildings easily visible from a public road. I personally don’t have a pot garden elevated in raised beds but I would if that’s the only way I could grow some of my favorite foods.

The advantage of growing in pots is that you can change out the pots when the crop is done, refresh the soil and replace those pots with new ones for a fall crop. You also should not have issues with garden visitors such as rabbits. Raccoons and birds may still get into your bounty but you can secure your pots by covering them with netting.

When you get your elevated pot garden set up, would you share some photos? Would love to see how you get yours set up!

Charlotte

Battling Japanese Beetles

Soapy water in a coffee can early morning is the best time to catch Japanese beetles. (Photo by Charlotte Ekker Wiggins)

Soapy water in a coffee can early morning is the best time to catch Japanese beetles. (Photo by Charlotte Ekker Wiggins)

“Hi Charlotte, what are nematodes and where do I get them? I have heard that suicide beetles kill Japanese beetles also, saw two yesterday on a butterfly bush….” — Elaine

Battling Japanese Beetles

Hi Elaine,

Nematodes are microscopic parasitic roundworms that live in soil and destroy Japanese beetle grubs before they start the next growing cycle. You can find nematodes for sale at most home and garden centers. You are looking for the species that specifically targets Japanese beetles.

Your best bet for battling Japanese beetles is to remove them early morning by knocking them into a pan of water with drops of Dawn dishwashing liquid. They tend not to move as fast when the temperature is cooler.

Japanese beetles are lovely irridescent green invasive bugs. (Photo by Charlotte Ekker Wiggins)

Japanese beetles are lovely irridescent green invasive bugs. (Photo by Charlotte Ekker Wiggins)

Japanese beetles tend to show up in USDA Hardiness Zone 5 around early July. Their main purpose is to procreate during the 4-6 weeks they are in gardens consuming most edible plants from fruit trees to grape vines, Rose of Sharon to edible wildflowers.

Japanese beetles damage leaves but don’t kill plants. (Photo by Charlotte Ekker Wiggins)

Japanese beetles damage leaves but don’t kill plants. (Photo by Charlotte Ekker Wiggins)

If there is one consolation about these invasive bugs, their hearty appetite does not kill the plants, just disfigures them.

And most recently, assassin bugs have been noted as catching and eating Japanese beetles.

Charlotte

Grass in Iris Beds

I use vinca ground cover to hold in soil and keep iris rhizomes hydrated. (Photo by Charlotte Ekker Wiggins)

I use vinca ground cover to hold in soil and keep iris rhizomes hydrated. (Photo by Charlotte Ekker Wiggins)

“My iris beds have become covered in grass. How can I get that removed? Do I need to use landscape fabric?” — Cynthia

Grass in Iris Beds

Hi Cynthia,

I would grab a cup of coffee, or tea, put on my gardening gloves and head out after a good rain. The best way to keep your iris beds clean of grass is to remove the grass by hand. Make sure you get the roots, not just the green tops.

Once cleared, add a shallow layer of mulch. You don’t want to cover the iris rhizomes but you want to maintain a level of moisture around the roots. The mulch will help keep the moisture in and level out the temperature so the plants are less stressed.

In terms of landscaping fabric, I am not a fan. Soil is a living, breathing ecosystem so you want to keep soil hydrated and healthy. That’s way your plants stay healthy.

I was once given a roll of landscape fabric and placed it on a couple of paths covered in mulch. I have since pulled it all up and tossed it. I would rather keep something growing on the paths cut short with my weed eater than smother what may try to grow and destroy the soil.

After removing the grass, consider planting a ground cover to keep your iris hydrated. Lamb’s Ears and Vinca are both excellent ground covers that can keep soil hydrated.

Charlotte

Leave or Cut Iris Flowers

After blooming, iris flowers form seed pods unless the dead heads are cut off. (Photo by Charlotte Ekker Wiggins)

After blooming, iris flowers form seed pods unless the dead heads are cut off. (Photo by Charlotte Ekker Wiggins)

“..my irises have died back and are now making seed pods. Should I leave them or cut off the flowers?” — Gary

Leave or Cut Iris Flowers

Hi Gary,

If you want more irises, leave the seed pods. You can cut them off after they dry and store them to plant next year.

If you don’t want more of the pod-generating iris, I would cut them off right after they bloom, that way the plant is not spending energy making the seeds.

I have a number of different gift irises from friends and family throughout my garden. This is one of the newest additions:

One of the new iris to bloom this year in my Missouri limestone hillside garden. (Photo by Charlotte Ekker Wiggins)

One of the new iris to bloom this year in my Missouri limestone hillside garden. (Photo by Charlotte Ekker Wiggins)

If you want to move your iris, I like to do so right after they bloomed through about early fall. That way the plant roots still have time to settle in before winter. They also will bloom again next year as opposed to waiting a growing cycle or two.

Also remember to mark the fading iris so you remember what color they are. It’s helpful to minimize moves and get them established in their final flower bed so you can enjoy them for years to come.

Charlotte

Moldy Seed Starting

Zinnia seeds getting a good start in a chicken rotisserie container. (Photo by Charlotte Ekker Wiggins)

Zinnia seeds getting a good start in a chicken rotisserie container. (Photo by Charlotte Ekker Wiggins)

“….I have a question. I’m starting seeds in a barbecue container and it’s now growing mold. Will the seeds be ok?” — Sally

Moldy Seed Starting

Hi Sally,

I love repurposing those chicken - and other - containers to grow seeds. Your question inspired me to start my miniature zinnia seeds. We had so much moisture this spring it may be late in the season before I can get zinnia seeds planted outside. Zinnias are a favorite of butterflies and other pollinators.

I’m using these two repurposed containers to grow zinnia seeds. (Photo by Charlotte Ekker Wiggins)

I’m using these two repurposed containers to grow zinnia seeds. (Photo by Charlotte Ekker Wiggins)

First, did you already have, or did you add, holes in the bottom of the container? That will help keep the water drained so the soil doesn’t become saturated and encourage fungal growth.

Secondly, when you see condensation on the lid, do you remove it? The clear lid should stay on just long enough to get the seeds started. Then you want to take the lid off so the seeds can start getting acclimated to your growing conditions.

Miniature zinnia seeds started 5 days after getting planted. (Photo by Charlotte Ekker Wiggins)

Miniature zinnia seeds started 5 days after getting planted. (Photo by Charlotte Ekker Wiggins)

When you are first planting, also use a spray bottle to moisten the soil, you don’t want to get it too wet.

Whenever planting seeds, use a spray bottle to control moisture. (Photo by Charlotte Ekker Wiggins)

Whenever planting seeds, use a spray bottle to control moisture. (Photo by Charlotte Ekker Wiggins)

I keep the spray bottle nearby and spritz the seeds daily as they are growing.

I also have them in indirect sun until their first true leaves grow. Then I will move them into direct sunlight for a couple of hours every day. Once they are growing, they will get thinned out, then moved outside for a few hours every day until it’s time to plant them in the garden.

Take the clear lid off when you see condensation on it. (Photo by Charlotte Ekker Wiggins)

Take the clear lid off when you see condensation on it. (Photo by Charlotte Ekker Wiggins)

I would remove your lid and let the soil dry out. A quick spray of water daily should rehydrate the soil and keep the seedlings happy but discourage any further fungus from growing.

Let me know how this works for you!

Charlotte